
User Manual


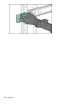


Table Of Contents
- HPE ProLiant DL360 Gen10 Server User Guide
- Contents
- Component identification
- Front panel components
- Front panel LEDs and buttons
- Systems Insight Display LEDs
- Systems Insight Display combined LED descriptions
- Rear panel components
- Rear panel LEDs
- System board components
- Device numbers
- Hot-plug drive LED definitions
- NVMe SSD LED definitions
- uFF drive components and LEDs
- Hot-plug fans
- HPE Smart Array P824i-p MR Gen10 Controller
- Operations
- Power up the server
- Powering down the server
- Extend the server from the rack
- Remove the server from the rack
- Remove the access panel
- Installing the access panel
- Remove the hot-plug fan
- Removing the primary PCI riser cage
- Install the primary PCI riser cage
- Removing the secondary PCI riser cage
- Install the secondary PCI riser cage
- Removing the 8 SFF drive backplane
- Releasing the cable management arm
- Setup
- Hardware options installation
- Hewlett Packard Enterprise product QuickSpecs
- Introduction
- Installing a redundant hot-plug power supply
- Memory options
- Installing a high-performance fan
- Drive options
- Hot-plug drive guidelines
- Removing the hard drive blank
- Installing a hot-plug SAS or SATA drive
- Removing a hot-plug SAS or SATA hard drive
- Installing the NVMe drives
- Removing and replacing an NVMe drive
- Installing a uFF drive and SCM drive carrier
- Removing and replacing a uFF drive
- Installing an 8 SFF optical drive
- Universal media bay options
- Installing the 4 LFF optical drive option
- Installing the rear drive riser cage option
- Primary PCI riser cage options
- Secondary PCI riser options
- Controller options
- Installing an HPE Smart Array P408i-a SR Gen10 Controller option
- Installing an HPE Smart Array P408i-p SR Gen10 Controller option
- Installing an HPE Smart Array P816i-a SR Gen10 Controller option
- Installing an HPE Smart Array P824i-p MR Gen10 controller in a configured server
- Installing the operating system with the HPE Smart Array MR Gen10 P824i-p controller driver
- Processor and heatsink options
- Installing the Systems Insight Display power module
- Installing the 4 LFF display port/USB module
- Installing the serial cable option
- Installing the Chassis Intrusion Detection switch option
- Installing a FlexibleLOM option
- Energy pack options
- HPE Trusted Platform Module 2.0 Gen10 option
- Cabling
- Software and configuration utilities
- Server mode
- Product QuickSpecs
- Active Health System Viewer
- HPE iLO 5
- Integrated Management Log
- Intelligent Provisioning
- Management Security
- Scripting Toolkit for Windows and Linux
- UEFI System Utilities
- HPE Smart Storage Administrator
- HPE MR Storage Administrator
- StorCLI
- USB support
- Redundant ROM support
- Keeping the system current
- Troubleshooting
- Removing and replacing the system battery
- Specifications
- Environmental specifications
- Server specifications
- Power supply specifications
- HPE 500W Flex Slot Platinum Hot-plug Low Halogen Power Supply
- HPE 800W Flex Slot Platinum Hot-plug Low Halogen Power Supply
- HPE 800W Flex Slot Titanium Hot-plug Low Halogen Power Supply
- HPE 800W Flex Slot Universal Hot-plug Low Halogen Power Supply
- HPE 800W Flex Slot -48VDC Hot-plug Low Halogen Power Supply
- HPE 1600W Flex Slot Platinum Hot-plug Low Halogen Power Supply
- Hot-plug power supply calculations
- Websites
- Support and other resources
- Acronyms and abbreviations

WARNING: To reduce the risk of personal injury or equipment damage, be sure that the rack is
adequately stabilized before extending a component from the rack.
WARNING: To reduce the risk of personal injury, be careful when pressing the server rail-release
latches and sliding the server into the rack. The sliding rails could pinch your fingers.
5. After performing the installation or maintenance procedure, slide the server into the rack:
a. Slide the server fully into the rack.
b. Secure the server by tightening the thumbscrews.
6. Connect the peripheral cables and power cords.
Remove the server from the rack
To remove the server from a Hewlett Packard Enterprise, Compaq-branded, Telco, or third-party rack:
Procedure
1. Power down the server (Powering down the server on page 30).
2. Extend the server from the rack (Extend the server from the rack on page 30).
3. Disconnect the cabling and remove the server from the rack. For more information, see the documentation
that ships with the rack mounting option.
4. Place the server on a sturdy, level surface.
Remove the access panel
WARNING: To reduce the risk of personal injury from hot surfaces, allow the drives and the internal
system components to cool before touching them.
CAUTION: Do not operate the server for long periods with the access panel open or removed.
Operating the server in this manner results in improper airflow and improper cooling that can lead to
thermal damage.
To remove the component:
Procedure
1. Power down the server (Powering down the server on page 30).
2. Extend the server from the rack (Extend the server from the rack on page 30).
3. Open or unlock the locking latch, slide the access panel to the rear of the chassis, and remove the access
panel.
Installing the access panel
Procedure
1. Place the access panel on top of the server with the latch open.
Operations 31