
- Hewlett-Packard Envelope Imager Operator's Manual


SECTION 2
INSTALLATION & SETUP
Media Thickness Adjustment
Adjust the Printhead Carriage height, to accommodate the thickness of your media.
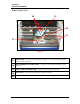
1. Turning the Media Thickness Knob [A]
fully counter-clockwise, to raise the
printhead carriage to its highest
position.
2. Place a piece of media [B] under the
printhead carriage rollers.
3. Adjust the Media Thickness Knob [A]
clockwise until the printhead carriage
rollers begin to touch the Media [B].
4. Continue to turn the Media Thickness
Knob [A] clockwise, an additional 4 or
5 clicks.
5. When properly adjusted the Media [B]
should be securely captured between
the printhead carriage rollers and the
lower transport rollers. It should require some resistance to pull the Media [B] from under the
printhead carriage rollers.
A
B
Figure 17
IMPORTANT! To help avoid ink wicking (ink leakage; caused when cartridge nozzles come in
contact with an absorbent material) and to help avoid developing flat spots on the transport rollers;
always raise the printhead carriage to the highest position, when the printer is not in use.
Loading Media
When placing media into the printer, it is important to follow these steps.
1. Start by placing a single piece into the feed
section, so that it is touching or starting to
feed under the sheet separators.
Figure 18
2. Fan the stack of material so the bottom pieces
are closest to the separation point.
3. Additional pieces can be placed onto the
stack, as described in the above step.
4. If the printer runs out of material, be sure to
reload the printer beginning with the first step.
Envelope Imager 1.5/1.5 Plus Operations (Rev.6/7/2007)
16