
Operation Manual


Set up and use accessories
If you want to install and set up accessories (such as a second tray and duplexer), see the following
sections.
When using more than one tray, you can make use of the tray features provided to achieve a better
experience.
NOTE: You can purchase the accessories online at www.hp.com. Look for Shop for Products and
Services.
●
To install a duplexer, see
Install the automatic two-sided printing accessory (duplexer)
on page 30.
●
To install Tray 2, see
Install and use second tray (Tray 2) on page 30.
●
To understand about using tray features, see
Work with trays on page 31.
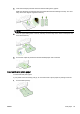
Install the automatic two-sided printing accessory (duplexer)
For information on duplexing, see Print on both sides (duplexing) on page 48.
To install a duplexer
▲
Slide the duplexer into the back of the printer until the unit locks into place.
Do not press the buttons on either side of the duplexer when installing the unit; use them only for
removing the unit from the printer.
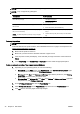
Install and use second tray (Tray 2)
To install Tray 2
1. Unpack the tray, remove the packing tapes and materials, and move the tray to the prepared
location.
The surface must be sturdy and level.
2. Turn off the printer, and unplug the power cord from the electrical socket.
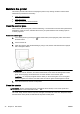
3. Set the printer on top of the tray.
CAUTION: Be careful to keep your fingers and hands clear of the bottom of the printer.
4. Connect the power cord and turn on the printer.
5. Enable Tray 2 in the printer driver.
For more information, see
Work with trays on page 31.
30 Chapter 2 Get started ENWW