
- Hewlett-Packard LaserJet Owner's Manual


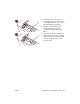


Table Of Contents
- Printer Setup
- Contents
- Introduction
- Installation checklist
- Step 1 Prepare printer location
- Step 2 Check package contents
- Step 3 Locate printer parts
- Step 4 Remove internal packaging
- Step 5 Install accessories
- Step 6 Install print cartridge
- Step 7 Load Trays 2 and 3
- Step 8 Connect printer cables
- Step 9 Connect power cord
- Step 10 Change the control panel overlay
- Step 11 Configure the control panel display language
- Step 12 Print a configuration page
- Step 13 Install printing software
- Step 14 Verify printer setup
- Customer support options worldwide
- Warranty and regulatory information
- Declaration of Conformity

20 Printer Setup ENWW
Step 10 Change the control panel overlay
The control panel comes with an English
overlay installed. If necessary, use the
procedure below to change the control
panel overlay to one included in the box.
To change the overlay
1 Locate the power switch on the front
of the printer. Press the power switch
to turn the printer off (button out).
2 Insert your fingernail or a thin, rigid
object in back of the overlay and lift
up.
3 Gently lift the overlay up and
backward to move it away from the
printer.
1
2
3