
- Hewlett-Packard LaserJet Owner's Manual


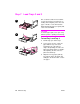
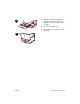
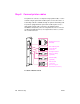


Table Of Contents
- Printer Setup
- Contents
- Introduction
- Installation checklist
- Step 1 Prepare printer location
- Step 2 Check package contents
- Step 3 Locate printer parts
- Step 4 Remove internal packaging
- Step 5 Install accessories
- Step 6 Install print cartridge
- Step 7 Load Trays 2 and 3
- Step 8 Connect printer cables
- Step 9 Connect power cord
- Step 10 Change the control panel overlay
- Step 11 Configure the control panel display language
- Step 12 Print a configuration page
- Step 13 Install printing software
- Step 14 Verify printer setup
- Customer support options worldwide
- Warranty and regulatory information
- Declaration of Conformity

ENWW Locate printer parts 9
Step 3 Locate printer parts
The following illustrations give the location and names of the
important printer parts.
Printer parts (front and rear views)
A
B
E
G
C
D
F
I
J
K
L
M
H
A Face-up bin
B Control panel
C Tray 2
D Power switch
E Standard output bin
(Face-down bin)
F Front door
G Tray 3
H EIO slots (3)
I Parallel cable
connector
J Foreign interface
harness (AUX)
K HP Fast InfraRed (FIR)
Connect
L HP Jet-Link connector
M Power cord connector