
Hitachi Dynamic Link Manager Software Users Guide for Solaris


# ufsdump 0f - /usr | (cd /mnt1; ufsrestore rf -)
7. Edit the file /etc/vfstab (/mnt0/etc/vfstab) of the boot disk after the
migration to change the definition of the swap after the migration to a
metadevice (/dev/md/dsk/d20) and change the definition of /usr after
the migration to a metadevice (/dev/md/ds/d30).
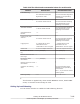
Before change:
/dev/md/dsk/d200 - swap - no -
/dev/md/dsk/d300 /dev/md/rdsk/d30 /usr ufs 1 no -
After change:
/dev/md/dsk/d20 - swap - no -
/dev/md/dsk/d30 /dev/md/rdsk/d300 /usr ufs 1 no -
8. Edit the file /etc/dumpadm.conf (/mnt0/etc/dumpadm.conf) of the boot
disk after the migration to change the definition of the dump device
specified for the parameter DUMPADM_DEVICE to the boot disk of the post-
migration environment.
Before change:
DUMPADM_DEVICE=/dev/md/dsk/d200
After change:
DUMPADM_DEVICE=/dev/md/dsk/d20
9. Execute the metaroot command.
Use the -R option to specify the mount point of the / (root) file system
after the migration.
For example:
# metaroot -R /mnt0 d10
10. Reboot from the post-migration environment.
The following figure shows the disk to actually be used as the boot disk.
3-136
Creating an HDLM Environment
Hitachi Dynamic Link Manager (for Solaris) User Guide