
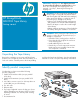
HP StorageWorks MSL2024 Tape Library getting started guide (AH559-96001, March 2007)
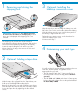


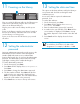
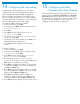


Control keys
The OCP displays a scrolling menu that lets you access
information and execute commands using the four
control keys.
Cancel – Cancels the current menu option, returns to the
previous menu level, or returns to the Home screen
Enter – Executes the current menu or selects the current
option displayed on the LCD screen
Previous – Selects the previous item or value in the
currently displayed menu
Next – Selects the next item or value in the currently
displayed menu
LED indicators
The OCP has four LEDs that provide a variety of
information.
Ready – Green when power is on, blinking with tape
drive or Library robotics activity
Clean – Amber when a cleaning cartridge should
be used
Attention – Amber if the Library has detected a
condition that requires attention
Error – Amber if an unrecoverable tape drive or Library
error occurs. A corresponding error message displays on
the LCD screen
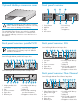
Operating the Tape Library
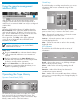
Operator Control Panel (OCP)
The OCP has a power button, four LEDs, four control
keys, and a 2-line by 16-character LCD screen. The
OCP provides everything you need to monitor the Tape
Library’s status and to control its functions.
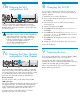
Using the remote management
interface (RMI)
Status icons
The green Status OK icon indicates that the Library
is fully operational and that no user interaction is
required.
The blue exclamation point Status Warning icon
indicates that user intervention is necessary, but that
the device can still perform operations.
The red X Status Error icon indicates that user
intervention is required and that the Library is not
capable of performing operations.
With the RMI, you can monitor the Library's status,
configure it, and control most of its functions from a
web browser or terminal. SNMP can only be configured
with the RMI.
Login
Using the OCP, find the Library's IP address from the
Info > Network screen. Open any HTML web browser
and enter the Library's IP address. Select the account
type. For the administrator account you must also enter
the administrator password. Click Sign In.
Once signed in, click Help in the upper right hand
corner for more information about the fields and
information in the RMI.
NOTE: You must set the Administrator password
with the OCP before you can use the RMI’s
administrator functions.