
HP StorageWorks 1/8 G2 Tape Autoloader getting started guide (AH163-96009, March 2007)
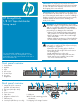


Changing the SCSI ID
10
If you need to change the Autoloader’s SCSI ID:
1. Attach the power cord to the Autoloader.
2. Power on the Autoloader by pressing the power
button on the front panel.
3. Check the LCD screen to make sure the Autoloader is
receiving power.
Set the SCSI ID from the Operator Control Panel on the
front panel:
1. Press Enter.
2. Press Next until the display shows Configuration.
Press Enter.
3. Press Next until the display shows Change Drive.
Press Enter.
4. Press Next until the display shows the new SCSI
address. Press Enter.
Power off the Autoloader.
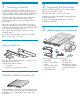
Connecting a parallel
SCSI Autoloader
11a
To HBA
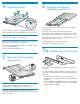
Connecting a SAS
Autoloader
11b
1. Attach one end of the parallel SCSI cable to one of
the connectors on the drive. Attach the other end of
the cable to the host bus adaptor (HBA), or the
connector to the previous device on the bus.
2. If the Autoloader is the last or only device on the
bus, attach a terminator to the remaining parallel
SCSI connector on the drive. Otherwise, attach the
parallel SCSI cable from the next device on the bus.
Make sure that the last device on the bus is properly
terminated.
Configuring the Autoloader
13
Attach the Ethernet cable to the Autoloader and to the LAN.
Attach the power cord to the back of the Autoloader.
Plug the power cord into a properly grounded power outlet.
Power on the Autoloader by pushing the power button on
the front panel. Check the LCD screen to make sure the
Autoloader is receiving power.
Power on the server and any devices you powered off
earlier.
Verify the installation with the HP Library & Tape Tools.
Powering on the Autoloader
12
To configure the Autoloader from the OCP:
1. Click Enter.
2. Click Next until the display shows Configuration.
Click Enter.
3. Click Enter to change the administrator password.
4. The first number will flash. Click Next until the first
number for the new password is displayed. Click
Enter to accept the number. The next number flashes.
Repeat for each number in the password.
5. Click Cancel to move up a level in the menu.
6. Click Next until the display shows Autoloader
Date/Time. Click Enter.
7. A number in the year will flash. Click Next and Prev
until the correct number is displayed. Click Enter to
accept the number. Repeat for each number in the
date and time.
8. Click Cancel to move up a level in the menu.
9. Click Next to Configure Network Settings.
Click Enter.
10. The screen displays either DHCP Disabled or
DHCP Enabled. To accept this setting, click Next.
To change this setting, click Enter. Follow the
directions on the display to configure additional
network settings.
Attach the Mini SAS connector on the SAS cable to the
tape drive. Attach the SAS 4x (IB) connector to the HBA.