HP StorageWorks DAT Tape Drives User Guide Installation, Operating and Troubleshooting information for DAT USB tape drives Part number: DW022-90904 First edition: April 2005
Legal and notice information © Copyright 2005 Hewlett-Packard Development Company, L.P. Hewlett-Packard Company makes no warranty of any kind with regard to this material, including, but not limited to, the implied warranties of merchantability and fitness for a particular purpose. Hewlett-Packard shall not be liable for errors contained herein or for incidental or consequential damages in connection with the furnishing, performance, or use of this material.
Contents About this guide . . . . . . . . . Contents ................................ 5 Related documentation . . . . Registering your tape drive . HP technical support . . . . . HP-authorized reseller . . Helpful web sites . . . . . .. .. .. .. .. . . . . . .. .. .. .. .. . . . . . .. .. .. .. .. .. .. .. .. .. . . . . . .. .. .. .. .. .. .. .. .. .. . . . . . .. .. .. .. .. . . . . . .. .. .. .. .. .. .. .. .. .. . . . . . .. .. .. .. .. .. .. .. .. .. . . . . . .. .. .. .. .. . . . .
Loading and unloading . . . . . . . . . . . . . . . . . . . . . . . . . . . . Inserting cartridges. . . . . . . . . . . . . . . . . . . . . . . . . . . . . Removing cartridges. . . . . . . . . . . . . . . . . . . . . . . . . . . . Removing power from the drive . . . . . . . . . . . . . . . . . . . . . . . . . . .. .. .. .. .. .. .. .. . . . . .. .. .. .. . . . . .. .. .. .. .. .. .. .. . . . . . . . . 29 29 30 30 7 Use the correct media . . . . . . . . . . . . . . . . . . . . . . . . . . . . . .
About this guide This guide provides information about: • Installing the HP StorageWorks DAT tape drive • Using the HP StorageWorks DAT tape drive • Troubleshooting the HP StorageWorks DAT tape drive Related documentation In addition to this guide, please refer to other documents for this product: • ‘Start here’ poster for an overview of the installation information in this guide (available in English, French, German and Japanese) These and other HP documents can be found on the HP documents web site: http
• After signing up, you can quickly locate your products by selecting Business support and then Storage under Product Category. HP-authorized reseller For the name of your nearest HP-authorized reseller: • In the United States, call 1-800-345-1518. • Elsewhere, visit the HP web site: http://www.hp.com. Then click Contact HP to find locations and telephone numbers. Helpful web sites For third-party product information, see the following HP web sites: • http://www.hp.com • http://www.hp.
1 Before you start HP StorageWorks DAT models This guide describes how to install and operate the following HP StorageWorks DAT USB tape drive models: • HP StorageWorks DAT 72 • HP StorageWorks DAT 40 • HP StorageWorks DAT 24 For a detailed product specification, please refer to our World Wide Web site (www.hp.com).
How do I connect the drive to my server? For optimum performance the drive should be connected to a USB 2.0 port and it should be the only device on the USB bus. Although the tape drive will function on USB 1.1, performance will be severely degraded. See also ”Verifying USB installation for optimum performance” on page 42. Appropriate USB cables are supplied with your tape drive. NOTE: For internal drives, the USB 2.
2 Drivers and backup software Install drivers Installing on Windows Two drivers are required in order to use HP StorageWorks DAT USB tape drives. • hpdat: This is the tape driver that works with all HP DAT products. It is regularly updated and is available on the HP StorageWorks CD-ROM or on the HP Support web site. • hp_usbstor: This is a USB Storage device used by hpdat and it replaces the Microsoft usbstor driver for HP USB tape drives.
Upgrade backup software It is important to check www.hp.com/go/connect for software compatibility and install any recommended upgrades. For optimum performance it is important to use a backup application that is appropriate for your system’s configuration. In a direct attach configuration, where the tape drive is attached to a standalone server, you can use backup software that is designed for a single server environment.
3 Installing an internal DAT tape drive If you are installing an external DAT tape drive, please refer to Chapter 4. NOTE: It is important to ensure that you connect your drive to a USB 2.0 port. The drive will work on a USB 1.1 port but performance will be severely degraded. See also ”Verifying USB installation for optimum performance” on page 42.
Figure 2 Removing cover from typical ProLiant server Figure 3 Removing cover from typical AlphaServer 4. Remove the filler panel from a spare 5¼-inch bay of your server, as described in your server’s documentation. Keep any screws for use in ”Secure the drive” on page 21. 5. You are now ready to install your tape drive.
Attach mounting hardware If your server requires special rails or other hardware to install the tape drive, mount them on the tape drive now. If your server does not require special mounting hardware, proceed to ”Install drive” on page 16 now. CAUTION: Static electricity can damage electronic components. Always wear an antistatic wriststrap if one is available. If not, after you have disconnected power from the server and removed the cover, touch a bare metal part of the chassis.
Mounting rails Some HP ProLiant servers, such as ML530 and ML570, require mounting rails. These may be metal or plastic rails attached to the filler panel of the server's drive bay. 1. Use a regular Phillips screwdriver to attach the appropriate rails. Use the M3 screws provided with the tape drive, as shown in Figure 4. Ensure you do use the M3 screws provided. The rails may be attached to the filler panel by screws of a different thread/size type and these should not be used.
Mounting screws Other HP ProLiant server models, such as ML350 and ML370, only require the use of special locating screws with no mounting rail. 1. Use a Torx screwdriver to attach the appropriate screws. You may need to purchase the M3 screws separately. Position the screws, as shown in Figure 5. Figure 5 Attaching mounting screws 1 2 1 M3 mounting screws 2 M3 offset mounting screws • HP ProLiant ML350: Use M3 mounting screws. These have a thicker head than the standard M3 screws.
Install drive 1. Slide the tape drive into the open bay, aligning the tray or rails with the slots in the bay, as shown in Figure 6. Figure 6 Installing tape drive If your server does not use mounting hardware, check that the holes in the chassis are aligned with the holes in the side of the tape drive. Do not secure the drive at this point because you may have to move the drive to get the cables into place.
Attach USB cable Decide which cable to use Two USB cables are supplied with your tape drive because there are several options for connecting the tape drive to your server: • To an internal 4-pin USB port on your server’s system board; this option uses the special, 4-pin USB cable and is appropriate for many HP ProLiant servers • To an internal standard USB port, possibly on your server’s system board or on an internal USB card; this option uses the standard USB cable • To an external USB port on your server
To connect to an internal USB 2.0 port (as in many ProLiant servers) 1. Use the schematic on the inside of the server panel to check whether your server has an internal USB 2.0 port and locate its position. 2. Use the cable supplied with the tape drive to connect to the server. • If your server has a 4-pin USB port, use the supplied, special, 4-pin USB cable, as illustrated in Figure 8. Figure 8 Connecting to a 4-pin USB port • If your server has a standard USB port, use a standard USB cable.
2. Fit the grommet to the cable. Making sure the Type B connector is facing in towards the tape drive, slide the grommet into the bracket, as illustrated in Figure 9. Fix the bracket to the server and use the supplied cable ties to tidy up any excess cable. Figure 9 Connecting USB cable 2 1 1 Type A connector, to server’s external USB port 2 Type B connector, to tape drive 3.
Attach power cable NOTE: The drive is not powered from the USB bus. It must be connected to the server's power supply. 1. Attach a spare power cable from the server's internal power supply to the power connector.
Secure the drive NOTE: The server latches and side views of your server model may not be exactly the same as shown in the illustrations. Please refer also to you server documentation. Mounting hardware used (HP ProLiant) Ensure that you use the correct mounting rails or locating screws, as described in ”Attach mounting hardware” on page 13. The server also incorporates a locking mechanism to hold the tape drive in place. 1.
No mounting hardware used 1. Use the M3 screws provided with the tape drive. Check that the holes in the chassis are aligned with the holes in the sides of the drive and use a regular Phillips screwdriver to secure the M3 screws, as shown in Figure 12. Figure 12 Securing drive, no mounting hardware used 1 1 M3 screws, supplied with tape drive 2. Ensure blanking plates are in place over empty bays and replace the cover on the server.
4 Installing an external DAT tape drive If you are installing an internal DAT tape drive, please refer to Chapter 3. Connecting the power and USB cables NOTE: The drive is not powered from the USB bus. It must be connected to the mains power supply. An external HP StorageWorks DAT drive will operate using any voltage in the range 100–240 volts (0.7 A, 50-60 Hz). No adjustment is needed. A power cable is provided with your HP StorageWorks DAT tape drive. The USB 2.
3. Plug the USB cable into the USB connector on the server. NOTE: It is important to ensure that you connect your drive to a USB 2.0 port. The drive will work on a USB 1.1 port but performance will be severely degraded. See also ”Verifying USB installation for optimum performance” on page 42.
5 Verify installation Once you have installed the drive hardware, check that drivers have been installed correctly and you have the correct version of backup software, and verify that the tape drive is functioning properly before you store your valuable data. 1. Switch on the drive and the server. 2. The tape drive will run its hardware self-test, which takes about 5 seconds. At the end of the hardware self-test, both front panel lights should be off.
Verify installation
6 Operating your tape drive Front panel Figure 14 Front panel, external drive 1 2 5 4 1 cartridge door 2 eject button 3 clean LED 4 tape LED 5 power LED (external drives only) 3 HP StorageWorks DAT Tape Drives User Guide 27
There are two LEDs, labeled Tape and Clean. The meaning of different patterns of LEDs is as follows: Tape LED 28 Clean LED Meaning on off The cartridge is loaded and the drive is ready. flashing slowly off The cartridge is loading or unloading, or self-test is in progress. flashing rapidly off The cartridge is loaded, activity is occurring. any off or flashing on This is the Error Condition Signal. HP StorageWorks DAT drives perform a comprehensive self-test during power-up.
Loading and unloading Inserting cartridges Figure 15 Inserting a cartridge, external drive 1 2 1 cartridge door 2 arrow indicates leading direction 1. Insert a cartridge into the slot on the front panel. As the cartridge is inserted, the drive takes it and performs a load sequence. 2. The Tape light flashes green while the drive performs its load sequence. When the cartridge is loaded, the Tape light shows steady green.
Removing cartridges CAUTION: Never try to remove a cartridge before it is fully ejected. 1. Press the Eject button on the front panel. Figure 16 Ejecting a cartridge, external drive 1 1 eject button 2. The drive completes any task it is currently performing, winds the tape to the beginning, and ejects the cartridge. The sequence will take about 25 seconds for a write-enabled cartridge and 10 seconds for a write-protected cartridge.
7 Use the correct media For best performance we recommend HP branded media. Order online at: www.hp.com/go/storagemedia. If you do not have internet access, refer to the User’s Guide on the HP StorageWorks Tape CD-ROM for ordering information for tape cartridges and cleaning cartridges. Data cartridges For optimum performance and storage capacity, use tape cartridges that match your drive's format, and normally use only one cartridge per day.
Write-protecting cartridges If you want to protect the data on a cartridge from being altered or overwritten, you can write-protect the cartridge. Figure 17 Write protecting a cartridge 1 1 tab closed, cartridge write-enabled 2 tab open, cartridge write-protected 2 Always remove the cartridge from the tape drive before you change the write protection. • To write-protect a cartridge, slide the tab on the rear of the cartridge so that the recognition hole is open.
1. Insert a cleaning cartridge into the drive. The tape drive automatically loads the cartridge and cleans the heads. At the end of the cleaning cycle, the drive ejects the cartridge. The cleaning cycle takes approximately 30-60 seconds. HP StorageWorks DAT 40 and 24 drives: If the cleaning cartridge ejects in less than 20 seconds, it has probably expired. In this case, discard the cleaning cartridge and repeat the operation with a new one.
Use the correct media
8 Using HP OBDR Compatibility HP One-Button Disaster Recovery is a standard feature on all HP StorageWorks DAT tape drives. However, it can only be used with specific configurations and will only recover the server to which the tape drive is directly connected. To check whether your system (hardware, operating system and backup software) is OBDR-compatible, please refer to our World Wide Web site www.hp.com/go/connect.
Refer to the HP OBDR web site at www.hp.com/go/obdr for more information about using this feature and compatibility. Testing for compatibility We recommend that you perform a full disaster recovery immediately after installation—if possible, onto a blank hard disk. If you do not have a blank hard disk and do not want to overwrite your system, you can safely cancel the disaster recovery process at step 3 in the following procedure. Refer to our connectivity web site (www.hp.
Recovery process. Release the button as soon as the Tape light and the Clean light on the front panel flash alternately, which is the OBDR sequence. Figure 19 Keeping eject button pressed down, power on in OBDR mode + external drives only, switch on tape drive before server Keyboard shortcut for HP ProLiant servers There is no need to press the Eject button. Just power on your server and press the [F8] function key during the Power On Self Test (POST). This invokes OBDR to restore your system.
Using HP OBDR
9 Diagnostic Tools and Performance Diagnostic tools HP Library & Tape Tools HP StorageWorks Library & Tape Tools is the recommended diagnostic and support tool for your HP tape storage product. It is available on the CD shipped with your product or as a free download from the HP web site. It is supported on nearly all major operating systems. See www.hp.com/support/tapetools for compatibility information, updates and the latest version of the tool.
• Run tests: allows you to run proactive tests on your drive, such as the drive assessment test, which will verify the functionality of your drive in around 20 minutes. HP recommends running this test before calling HP Support. You will need to provide a ‘trusted’ cartridge that can be written to during this test. • Generate a support ticket: this is a full dump of the drive logs along with interpretation and is used by HP Support to learn about the condition of your drive.
10 Troubleshooting Many users can use HP Library & Tape Tools to help them diagnose problems, see ”Diagnostic tools” on page 39. We also recommend the detailed troubleshooting guide at www.hp.com/go/support for comprehensive troubleshooting information. General Procedure If a problem occurs, the first step is to try to establish whether the problem lies with the cartridge, the drive, the host computer and connections, or the way the system is being operated.
3. If the problem persists, check the environmental conditions against the specified limits (refer to www.hp.com). Perhaps move the drive to a more suitable site. Has a new operating system been installed in the host computer? Has new backup software been installed? The problem could lie with the host or the software. Consult the computer’s operating manuals, the software manual, or seek help from a service engineer.
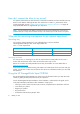
2. Expand Universal Serial Bus controllers and locate the tape drive. 3. If the tape drive is connected to the HP USB Mass Storage Device, it is configured correctly. See Figure 20. Figure 20 Windows Device Manager, USB controllers Check drivers (Linux) Use the following procedure to check that both drivers are present: 1.
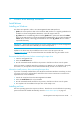
2. st tape driver • At the command prompt type: lsmod | grep st • The output of this command should contain a line similar to: st 35933 0 • If this line is not present, type: modprobe st at the command line to load the st driver. Frequently asked questions about USB drivers I installed my HP USB tape drive then powered on my server. Windows didn’t run the Found New Hardware wizard and the drive appears to work OK.
2. Wait for the cartridge to be ejected. The drive waits until 35 seconds have passed from the time of the first press, to give the normal eject procedure a chance to proceed. After this period, it immediately releases the tape and ejects the cartridge, regardless of what operation it was performing. It is important that you allow sufficient time for the drive to complete this process. If you interrupt it, you may damage the media or the tape drive.
Troubleshooting
11 Replacing an internal tape drive If your tape drive proves to be faulty and cannot be repaired and it is still covered by the original warranty, it will be replaced. To disconnect your drive 1. Unpack your replacement drive, and retain the packaging. 2. Power off the server and disconnect from the mains power supply. 3. Remove the cover from the server. 4. Observing normal anti-static precautions (see page 13) remove any screws that are holding the tape drive in place. 5.
Replacing an internal tape drive
A USB Configuration Guide USB in HP StorageWorks DAT devices The HP StorageWorks DAT tape drive is a USB 2.0 logo certified device. It supports the high-speed USB transfer rate with a theoretical maximum transfer of over 50 MB/s. (The actual backup rate will be less. This is defined by the transfer rate of the tape drive and the compressibility of the data.) To benefit from the high-speed performance of the USB 2.
The transfer speed capabilities of a device are often referred to by the USB specification revision in which the transfer rate was defined. Therefore a USB 2.0 Hub will support high, full and low speed, but a USB 1.1 hub will only support full and low speed. The USB specification was developed and is maintained by the USB organization. The USB organization also conducts a certification program.