
HP StorageWorks 3800ux/7100ux Optical Jukebox Conversion Guide (AA991-96001, May 2004)


Convert an MO Jukebox to UDO or Mixed-Media Technology
22 3800ux/7100ux Optical Jukebox Conversion Guide
Install an expansion (lower) power supply
Note: This procedure is required only if you are upgrading a 4- or 6-drive system to a 10-drive
system.
To install an lower power supply:
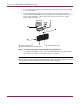
1. Place the lower power supply on the brackets below the existing power supplies (see
Figure 1).
2. Secure the lower power supply to the jukebox using 2 T-20 torx screws (at the top corners
of the power supply).
3. Connect the power switch cable to the lower power supply (see Figure 4).
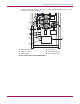
Figure 4: Connect power cable to power supplies
4. Connect the DC power cable to the lower power supply.
5. Route the bundled power supply cables (item 4 in Figure 4) to the right of the lower power
supply, below the lower power supply and the drive bays, to the interposer board.
Note: The cable ties have buttons that snap into the jukebox chassis, guiding the cables to their
proper location and keeping them secure and out of the way.
6. Connect the bundled power supply cables to the lower interposer board, as dictated by the
lengths and connection types.
1 Expansion (lower) power supply
2 Power switch cable to lower power supply
3 DC power cable to lower power supply
4 Power supply cables to lower interposer board
5 Cable tie (one of several) for power cables
6 AC input power cable to lower power supply
7 Main AC power supply cable from source
1
2
3
4
5
6
7