
HP Photosmart 8100 series Reference Guide


Insert the cartridges
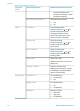
1 If you are replacing a cartridge, push down and
pull outward on the cartridge stall cover to open
it and then pull the cartridge out.
2 Match the symbol on the cartridge label to the
correct stall. Hold the cartridge with the label on
top and slide it at a slight upward angle into the
stall so the copper-colored contacts go in first.
Push the cartridge until it snaps into place.
3 Close the cartridge stall cover.
4 Repeat the previous steps to install the second
cartridge, if necessary.
5 When you are finished installing cartridges,
close the main cover.
You must install both cartridges in order for the
printer to work as intended.
Tip Ink-backup printing mode lets you keep
printing even if one of the cartridges fails or
runs out of ink. Remove the cartridge and
close the main cover to enter ink-backup
printing mode. The printer continues to print,
but at a slower speed and with inferior print
quality. A message reminds you that the printer
is in ink-backup printing mode. Replace the
cartridge as soon as possible.
The idle screen of the printer displays two icons
showing the approximate ink level for each cartridge
(100%, 75%, 50%, 25%, and nearly empty). Ink-
level icons do not appear if one or both installed
cartridges are not genuine HP cartridges.
Each time you install or replace a print cartridge, a
message prompts you to print an alignment page.
This ensures high-quality prints.
Align the cartridges
1 Load paper in the In tray.
2 Follow the onscreen instructions to complete
the cartridge alignment.
When you are not using a print cartridge
Whenever you remove a print cartridge
from the printer, store it in a print
cartridge protector, if available. The
cartridge protector keeps the ink from
drying out. Storing the cartridge
Chapter 1
Insert or replace the print cartridges (continued)
16 HP Photosmart 8100 series