hp photosmart 7700 series basics guide
hp photosmart 7700 series © Copyright 2003 Hewlett-Packard Company All rights are reserved. No part of this document may be photocopied, reproduced, or translated to another language without the prior written consent of Hewlett-Packard Company. The information contained in this document is subject to change without notice. Hewlett-Packard shall not be liable for errors contained herein or for consequential damages in connection with the furnishing, performance, or use of this material.
contents basics guide 1 get started . . . . . . . . . . . . . . . . . . . . . . . . . . . . . . . . . . . . 1 2 set the defaults on your printer . . . . . . . . . . . . . . . . . . . . 15 3 print from a memory card. . . . . . . . . . . . . . . . . . . . . . . . 21 welcome . . . . . . . . . . . . . . . . . . . . . . . . . . . . . . . . . . . . . . . 1 find information . . . . . . . . . . . . . . . . . . . . . . . . . . . . . . . . 2 view the hp photosmart printer help . . . . . . . . . . . . . . . .
scan a proof sheet . . . . . . . . . . . . . . . . . . . select a photo . . . . . . . . . . . . . . . . . . . . . . deselect a photo . . . . . . . . . . . . . . . . . . . . print photos from a memory card . . . . . . . . . . . print unmarked photos on a memory card. . . print camera-selected photos . . . . . . . . . . . . print new photos . . . . . . . . . . . . . . . . . . . . ... ... ... ... ... ... ... .... .... .... .... .... .... .... ... ... ... ... ... ... ...
get started 1 welcome Thank you for purchasing an HP Photosmart 7700 Series printer! With your new photo printer, you can print beautiful photos, save photos to your computer, and create fun and easy projects. For information about: basics guide • Printing photos stored on your memory card, see print from a memory card on page 21. • Printing camera-selected photos stored on your memory card, see print camera-selected photos on page 31.
chapter 1 find information Your new printer comes with the following documentation to help you get started and take full advantage of your printer’s capabilities: • Setup Guide — The HP Photosmart Setup Guide contains quick and easy instructions to help you set up your printer and install the printer software. • Basics Guide — The HP Photosmart 7700 Series Basics Guide is the booklet you are reading.
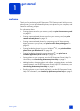
get started what’s in the box 1 9 2 8 5 6 4 7 3 Your printer box contains the following items: Note: Some contents may vary by country and region.
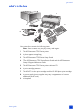
chapter 1 printer parts front Out tray Remove this tray to load small media and to clear a paper jam Top cover Lift the top cover to change the print cartridges Paper catch Lift this tray to load paper LCD screen Use this screen to view your photos and menu options Input bay door Lift this door to access the memory card slots and the direct-printing port Paper catch extension Flip this guide open to catch the printed paper Photo tray slider Move this slider to engage or disengage the photo tray Paper
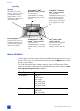
get started control panel PRINT NEW PHOTOS Press this button to automatically print the most recent photos on yourthat have not yet been printed ON Press this button to turn on the printer or put it into power-save mode ZOOM +/ZOOM – Press ZOOM + to enter into Zoom mode or press ZOOM – to view nine photos on the printer’s LCD screen at a time SELECT PHOTOS Use these arrows to view all photos or to move the selection box on a zoomed photo SIZE Press this button to adjust the print size of your photos SA
chapter 1 input bay Input bay Use this bay to insert a memory card or to connect your HP direct-printing digital camera or your notebook computer to the direct-printing port CompactFlash™/IBM® Microdrive memory card slot You can insert a CompactFlash or an IBM Microdrive memory card into this slot Direct-printing port Use this port to connect a notebook computer or an HP direct-printing digital camera to the printer MultiMediaCard™/Secure ™ Digital memory card slot You can insert a MultiMediaCard or a
get started Menu Option Choices Tools Slide show Print quality Print sample page Print test page Clean cartridges Calibrate printer Preferences After printing # of copies Photo size Video print Add date/time Borderless Exif printing Improve contrast Extend colors Paper detect Camera selections Restore defaults Language paper information You can print on a wide variety of paper types and sizes, from index cards and photo paper to envelopes and transparencies.
chapter 1 Your printer supports the following paper tray accessories that you can purchase separately: – Automatic Two-Sided Printing Accessory (HP C8955A) for double-sided printing – 250-sheet plain paper tray (HP Q3447A), which holds a half ream of plain paper load paper in the in tray You can print using many different types of paper in the In tray, including plain paper, HP photo paper, and HP premium inkjet transparency film.
get started 4 Adjust the paper width guide and the paper length guide to fit close to the edges of the paper without bending the paper. This adjustment helps the paper feed straight into the printer. 5 Lower the paper catch. 6 Pull out the photo tray slider until it stops. This action disengages the photo tray so the printer uses the paper in the In tray. load paper in the photo tray Use the photo tray when you want to print on 4 x 6 inch (10 x 15 cm) photo paper or L-size cards (3.
chapter 1 5 Adjust the photo tray paper length guide and paper width guide to fit close to the edges of the paper without bending the paper. This adjustment helps the paper feed straight into the printer. 6 Lower the paper catch. 7 Push the photo tray slider forward until it stops. The photo tray disappears from view in the photo tray window. This action engages the photo tray. print cartridge information Your printer prints in color and in black and white.
get started Caution! Check that you are using the correct print cartridges. Also, note that HP does not recommend modifying or refilling HP print cartridges. Damage that results from modifying or refilling HP print cartridges is not covered by HP’s warranty.
chapter 1 5 If you are replacing a print cartridge, slide out the old print cartridge and recycle or discard it. Note: For information about recycling print cartridges, go to www.hp.com/ recycle. 6 Take the new print cartridge out of its package. 7 Grasp the pink tab and gently peel off the plastic tape. Make sure you remove only the plastic tape.
get started 8 9 Insert the print cartridge: – Hold the print cartridge so the copper contacts go into the printer first. Line up the ridges on the left and right sides of the top of the print cartridge with the grooves on the inside of the print cartridge cradle. – Carefully slide the print cartridge into the cradle under the metal bar, then firmly push the print cartridge in until it stops. – Push down on the print cartridge latch until it locks. Close the top cover and press the OK button.
chapter 1 print cartridge storage The print cartridge protector is designed to keep your print cartridge from drying out when it is not being used. Whenever you remove a print cartridge from the printer, store it in the print cartridge protector that came with your printer. Note: It is important that you place the print cartridge into the print cartridge protector when it is not installed in the printer. Failure to properly store the print cartridge can cause the print cartridge to fail.
set the defaults on your printer 2 Your printer comes with default settings for features such as number of copies to print, photo size, language setting for the LCD screen, and other settings. You can change these settings to your preferences using the printer’s control panel. Note: When you print from your computer, the control panel settings on the printer do not apply. The software on your computer overrides the default settings you set using the printer’s control panel.
chapter 2 set the number of copies By default, your printer prints one copy of each photo. You can set the printer to print up to 99 copies of each photo. This setting applies whenever you select photos and press the OK button to print them. You can override this setting for the currently displayed photo by pressing the COPIES button and changing the number of copies for that photo before printing.
set the defaults on your printer Note: Combo prints five photos on one sheet—two photos at 4 x 6 inch (10 x 15 cm) and three photos at 2.5 x 3.25 inch (6 x 8 cm). The default size applies whenever you select photos and print them by pressing the OK button. You can override the default for the currently displayed photo by pressing the SIZE button and changing the size before printing. 1 On the printer’s control panel, press the MENU button.
chapter 2 set paper detection The printer automatically detects the paper size and type by scanning the paper in the In tray or the photo tray. You can set the printer to ask for the paper size and type each time you print by turning the paper detection sensor off. By default, this option is set to On. Note: The printer does not automatically detect the paper type and size when borderless printing is turned on. For more information, see set borderless printing on page 17.
set the defaults on your printer revert to the factory default settings If you made adjustments to the default settings, you can reset the printer to the original factory settings at any time. To revert to the factory default settings, follow these steps. Note: The language and country/region settings you chose will not change if you revert back to the factory default settings. 1 On the printer’s control panel, press the MENU button.
chapter 2 set print quality When printing photos, you can change the print quality from the control panel. Best quality is the default print quality and produces the best quality prints. Normal quality conserves ink and prints faster. To change the print quality, follow these steps. Note: The Normal print quality setting applies to only the next print job. The print quality is reset to Best quality when the print job is complete or is cancelled. 1 On the printer’s control panel, press the MENU button.
3 print from a memory card It’s easy to print high-quality photos for yourself, family, and friends. If your digital camera uses a memory card to store photos, you can insert the memory card into the printer to print your photos. Messages on the printer’s LCD screen guide you through the process—you don’t have to turn on your computer or even have your printer connected to a computer! Note: You can also print photos using your computer. For more information, see print from your computer on page 37.
chapter 3 supported file formats You can print certain file formats directly from the memory card. If your digital camera supports file formats that are not supported by your printer, you must first save the photos to your computer and then print them using a software application. For more information about supported image and video file formats, see printer specifications on page 54. For more information about saving files to your computer, see the HP Photosmart Printer Help.
print from a memory card Note: If you have camera-selected photos stored on the memory card, a message appears on the LCD screen asking if you want to print the cameraselected photos. For more information, see print camera-selected photos on page 31 and unmark camera-selected photos on page 18.
chapter 3 Memory card Memory card slot How to hold and insert the memory card Secure Digital Bottom left slot • Label faces up and angled corner is on the right • Metal contacts face down SmartMedia Upper portion of the top right double slot • Angled corner is on the left, and if the label has an arrow, the arrow points toward the printer • Metal contacts face down Sony Memory Sticks Bottom right slot • Angled corner is on the left and arrow points toward the printer • Metal contacts face down 2
print from a memory card Memory card Memory card slot How to hold and insert the memory card xD-Picture Card Lower right portion • Label faces up and arrow points toward the printer • Metal contacts face down of the top right double slot remove a memory card Use the procedures in this section to safely remove the memory card from the printer’s memory card slot. Caution! Do not pull out the memory card while the memory card light is blinking.
chapter 3 decide which photos to print or to send via e-mail You can decide which photos to print or send via E-mail by viewing the photos on the printer's LCD screen, printing a photo index page, or by printing a proof sheet. You can view the photos on the printer’s LCD screen, print a photo index page, or print a proof sheet to decide which photos you want to print. A photo index page shows thumbnail views and index numbers of the photos on the memory card.
print from a memory card 3 Use the arrows on the SELECT PHOTOS button to scroll through the photos. 4 Press the ZOOM + button to view the highlighted photo in normal view mode Note: At this point, you can enhance the photo, rotate the photo, or change the default settings for the photo displayed on the LCD screen. For more information, see the HP Photosmart Printer Help.
chapter 3 print a proof sheet A proof sheet, which may be several pages long, shows thumbnail views of all the photos stored on the memory card. A proof sheet is different than a photo index page because it provides spaces for you to select photos to print, specify the number of copies to print, and select the photo size and layout. It is a simple and convenient way to make prints directly from a memory card. You can use the photo number on the proof sheet to select which photos to print.
print from a memory card Once the proof sheet has printed, you can mark the proof sheet to indicate the photos you want to print, the size of the photos, and the number of photo copies you want to print. You can then scan the proof sheet into the printer, and the printer will print the selected photos to your specifications. For more information about how to select photos on a proof sheet then scan it into the printer, see the next section.
chapter 3 select a photo Once you have decided which photos on your memory card you want to print, you can use the printer’s control panel to select those photos for printing. For more information, see decide which photos to print or to send via e-mail on page 26. 1 Insert a memory card into the printer’s memory card slot and wait for the first photo stored on the memory card to appear on the LCD screen. 2 Press the SELECT PHOTOS on the memory card.
print from a memory card print unmarked photos on a memory card Unmarked digital photos are standard digital photos that you stored on the memory card but have not marked for printing. Not all digital cameras allow you to mark your photos for printing. 1 Insert a memory card into the printer’s memory card slot. 2 Press the SELECT PHOTOS on the memory card. 3 Press the OK button when the photo you want to print appears on the printer’s LCD screen.
chapter 3 print new photos The PRINT NEW PHOTOS button allows you to print all photos on a memory card that have not previously been printed from the memory card. Each time you insert a memory card into the printer’s memory card slot and print photos using the printer’s control panel, the printer tags the photos so that the next time you insert the same memory card, the printer will “remember” that the photos have already been printed.
print from the direct-printing port 4 For quick and easy printing, your printer allows you to connect a notebook computer or an HP direct-printing digital camera to the direct-printing port located on the front of the printer. To print using the direct-printing port, you must first install the HP Photosmart printer software on your notebook computer using the USB port located in the back of your printer.
chapter 4 3 4 When you connect your digital camera to the printer, a Print Setup menu appears on the camera’s LCD screen. Use this menu to: – Change the photos you have selected for printing – Select the paper type – Select the paper size When you are ready to print, follow the instructions on your camera’s LCD screen. Note: For more information about selecting photos on your digital camera, see the documentation that came with your digital camera.
print from the direct-printing port connect your notebook computer to the direct-printing port For quick and easy printing, your printer allows you to connect a notebook computer to the direct-printing port located in the front of the printer. To print from your notebook computer: 1 Connect one end of a USB cable to the notebook computer, then connect the other end of the cable to the direct-printing port located on the front of the printer.
chapter 4 36 hp photosmart 7700 series
print from your computer 5 You can use your printer with Windows PC or Macintosh software applications that allow printing. If you already know how to use a printer with your computer, you are ready to begin printing as usual. If you are new to printing, or if you have questions, use this chapter to learn more. When you print from your computer, the control panel settings on the printer do not apply; the software on your computer overrides the printer’s settings.
chapter 5 3 To access the printing properties tabs, you may have to click Properties or Preferences. For information about the HP Photosmart Series printing properties, see the HP Photosmart Printer Help. Note: The Properties button may be labeled Preferences and the Print dialog box may be different for each software application. Note: Depending on the operating system running on your computer, the HP Photosmart Series Properties dialog box may be titled HP Photosmart Printing Preferences.
print from your computer 1 Open the photo in a software application and from the File menu, select Print. 2 On the Print dialog box, click Properties or Preferences to access the HP Photosmart Series printing properties. If the software application you are using does not have a Properties or Preferences button on the Print dialog box, then skip to the next step. For more information, see print from a software application. 3 Select the Paper/Quality tab on the Print dialog box.
chapter 5 hp photosmart printer icon Use the HP Photosmart printer icon in the Windows taskbar to open the HP Photosmart Series Properties dialog box, select a default printer, or open the HP Photosmart Series Toolbox. 40 • When you click the printer icon, the printing properties dialog box appears. You can change the default print settings in this dialog box. • When you right-click the printer icon, a menu appears.
print from your computer hp photosmart memory card icon Use the HP Photosmart memory card icon to determine the status of your printer, access the files stored on your memory card, and display connection messages on your computer screen. The appearance of the icon tells you the status of the printer: When the memory card icon is green, a memory card is inserted in the printer and the printer is ready to access the files stored on the memory card.
chapter 5 print from your Macintosh Before you begin, make sure your printer is connected to your computer, the printer software that came in the box is installed, and there is paper in the printer. For more information about setup, see the HP Photosmart Setup Guide that came with your printer. For information about loading paper, see load paper in the in tray on page 8. Note: To print borderless photos from your computer, you must print from a software application that supports borderless printing.
print from your computer 3 Select the page attributes: – Select the paper size. – Select whether you would like to print borderless or bordered photos. If you are using OS 9, the borderless option appears as a check box. If you are using OS X, the borderless options appear under the Paper Size pop-up menus. – Select the orientation. – Enter the scaling percentage. 4 Click OK. 5 From the File menu in your software application, select Print. The Print dialog box appears.
chapter 5 44 hp photosmart 7700 series
troubleshooting 6 Your HP Photosmart printer is designed to be reliable and easy to use. This chapter answers frequently asked questions and contains information about the following topics: • hardware problems • printing problems • error messages For more troubleshooting information about software installation, see the reference guide that came with your printer. For advanced troubleshooting information, see the HP Photosmart Printer Help.
chapter 6 Problem Possible cause Solution The On/Attention light is blinking amber. An unrecoverable error has occurred. Turn off the printer. Unplug the printer’s power cord, wait one minute, then plug it in again. Turn on the printer. If this does not work, go to www.hp.com/ support or contact HP support. printing problems Before contacting HP support, read this section for troubleshooting tips or go to the online support services at www.hp.com/support.
troubleshooting Problem Possible cause The printer does not print new There are no new photos on photos on the memory card. the memory card or the photos have already been printed from the printer’s control panel. For more information, see print new photos on page 32. Solution Select and print the desired photos. For more information, see decide which photos to print or to send via e-mail on page 26.
chapter 6 Problem Possible cause Solution There may be too much paper Paper does not feed into the loaded in the In tray. printer correctly. OR Plain paper does not come out of the printer correctly. Remove some paper from the In tray and try printing again. For paper-loading instructions, see load paper in the in tray on page 8. The paper guides may not be adjusted correctly.
troubleshooting Problem Possible cause Solution Print quality is poor. You may be printing in Inkbackup Printing Mode. The printer enters Ink-backup Printing Mode when one of the print cartridges is missing. Replace the missing print cartridge with a new one. For more information, see install or replace print cartridges on page 11. You may have magnified the photo too much. Press the ZOOM – button one or more times to reduce the magnification.
chapter 6 error messages Before contacting HP support, read this section for troubleshooting tips or go to the online support services at www.hp.com/support. Message Problem Solution PAPER JAM. CLEAR JAM THEN PRESS OK. The paper jammed while printing. 1 Turn off the printer, then unplug it from the power source. 2 Remove the rear access door and remove the jammed paper. For more information, see the troubleshooting section in the HP Photosmart Printer Help for instructions on clearing a paper jam.
troubleshooting Message Problem Solution CARTRIDGE SERVICE STATION IS STUCK. There is an obstruction blocking the path of the cartridge service station. 1 Open the main door. The print cartridge service station is located beneath the print cartridge cradle. 2 Move the print cartridge cradle to the left to access the print cartridge service station. 3 Clear any obstruction and press the OK button to continue. PRINT CARTRIDGE JAM. CLEAR JAM The print cartridge cradle is THEN PRESS OK. stuck.
chapter 6 Message Problem Solution The printer did not receive the Try the following: DATA WAS NOT RECEIVED. data that the computer sent to • Make sure the USB cable is OR securely attached to both NO RESPONSE FROM COMPUTER. it. the computer and the USB port on the back of the printer. • Verify that you are using a high-quality USB cable that is less than 10 feet (3 meters) in length.
specifications 7 This chapter lists recommended papers for your printer and provides selected printer specifications. Note: For a complete list of printer specifications and system requirements, see the HP Photosmart Printer Help. recommended paper For a list of available HP-designed inkjet papers, or to purchase supplies, go to: • www.hpshopping.com (U.S.) • www.hp-go-supplies.com (Europe) • www.hp.com/paper (Asia/Pacific) • www.jpn.hp.
chapter 7 printer specifications 54 Connectivity, maximum HP JetDirect External Print Servers: 175x, 310x, 380x Connectivity, standard USB: Front and back ports Windows 98, 2000 Professional, ME, XP Home, and XP Professional Mac OS 9 v9.1 or later, OS X v10.1 through 10.
specifications Media sizes, standard Photo paper 3 x 3 inches to 8.5 x 14 inches (76 x 76 mm to 216 x 356 mm) Plain paper Letter, 8.5 x 11 inches (216 x 280 mm) Legal, 8.5 x 14 inches (216 x 356 mm) Executive, 7.5 x 10 inches (190 x 254 mm) A4, 8.27 x 11.7 inches (210 x 297 mm) A5, 5.8 x 8.3 inches (148 x 210 mm) B5, 6.9 x 9.8 inches (176 x 250 mm) Cards Hagaki, 3.9 x 5.8 inches (100 x 148 mm) L-size, 3.5 x 5 inches (90 x 127mm) L-size with tab, 3.5 x 5 with 0.5 inch tab (90 x 127 mm with 12.
chapter 7 Media types Paper (plain, inkjet, photo, and banner) Envelopes Transparencies Labels Cards (index, greeting, Hagaki, A6, L-size) Iron-on transfers Memory cards CompactFlash Type I and II IBM Microdrive MultiMediaCard Secure Digital SmartMedia Sony Memory Sticks xD-Picture Card Memory cardPrinting: Supported images and video file formats supported file formats Saving: All file formats 56 Out tray capacity 20 sheets of photo paper 50 sheets of plain paper 10 cards 10 envelopes 20 transparenc
index B # of copies, 16 after printing, 15 borderless printing, 17 country/region, 19 DPOF, 18 language, 19 paper detect, 18 photo size, 16 print quality, 20 restore defaults, 19 structure, 6 borderless printing, 17 problems, 46 C camera-selected photos print, 31 unmark, 18 control panel, 5 copies set number of copies, 16 D default settings, 19 DPOF, 18 print camera-selected photos, 31 E error messages, 50 H hardware problems, 45 hp photosmart printer help print, 2 view, 2 I icons memory card,
index basics guide 58
DECLARATION OF CONFORMITY according to ISO/IEC Guide 22 and EN 45014 ______________________________________________________________________ Manufacturer's Name: Hewlett-Packard Company Manufacturer's Address: 16399 West Bernardo Drive San Diego CA 92127, USA declares, that the product Regulatory Model Number (RMN): SDGOA-0377 Product Name: Photosmart 7760 (Q3015A) Model Number(s): Photosmart 7760 (Q3015A) conforms to the following Product Specifications: Safety: IEC 60950: 3rd Edition:1999 EN 60950
Printed on recycled paper Printed in U.S., 5/03 ENERGY STAR® is a U.S. registered mark. As an ENERGY STAR® partner, Hewlett-Packard Company has determined that this product meets the ENERGY STAR® guidelines for energy efficiency. www.hp.com © 2003 Hewlett-Packard Company *Q3015-90168* *Q3015-90168* Q3015-90168 v1.3.