HP Integrity Virtual Server Manager 6.1 User Guide
Table Of Contents
- HP Integrity Virtual Server Manager 6.1 User Guide
- Contents
- 1 Introduction
- 2 Installing Integrity Virtual Server Manager
- 3 Accessing and Navigating Integrity Virtual Server Manager
- 4 Using Integrity Virtual Server Manager views and tabs
- 5 Using Integrity Virtual Server Manager menus
- 6 Working with VMs or vPars
- Working with VMs
- Planning VMs
- Creating VMs
- Modifying VMs
- Starting VMs
- Stopping VMs
- Restarting VMs
- Deleting VMs
- Migrating VMs
- Suspending VMs
- Resuming VMs
- Moving suspend files
- Creating virtual switches
- Starting, stopping, and deleting virtual switches
- Deleting network or storage devices
- Opening iLO console
- Opening virtual iLO remote console
- Deleting virtual iLO remote console
- Deleting DIOs
- Adding DIOs
- Replacing DIO H/W path
- Replacing DIO MAC address
- Working with vPars
- Creating vPars
- Modifying vPars
- Booting vPars
- Stopping vPars
- Resetting vPars
- Creating virtual switches
- Starting, stopping, and deleting virtual switches
- Deleting network or storage devices
- Deleting vPars
- Opening iLO console
- Opening virtual iLO remote console
- Deleting virtual iLO remote console
- Adding DIOs
- Replacing DIO H/W path
- Replacing DIO MAC address
- Deleting DIOs
- Working with VMs
- 7 Collecting and viewing utilization data
- 8 Viewing logs and version information
- 9 Support and other resources
- A Error messages, status indicators, and troubleshooting
- Glossary
- Index

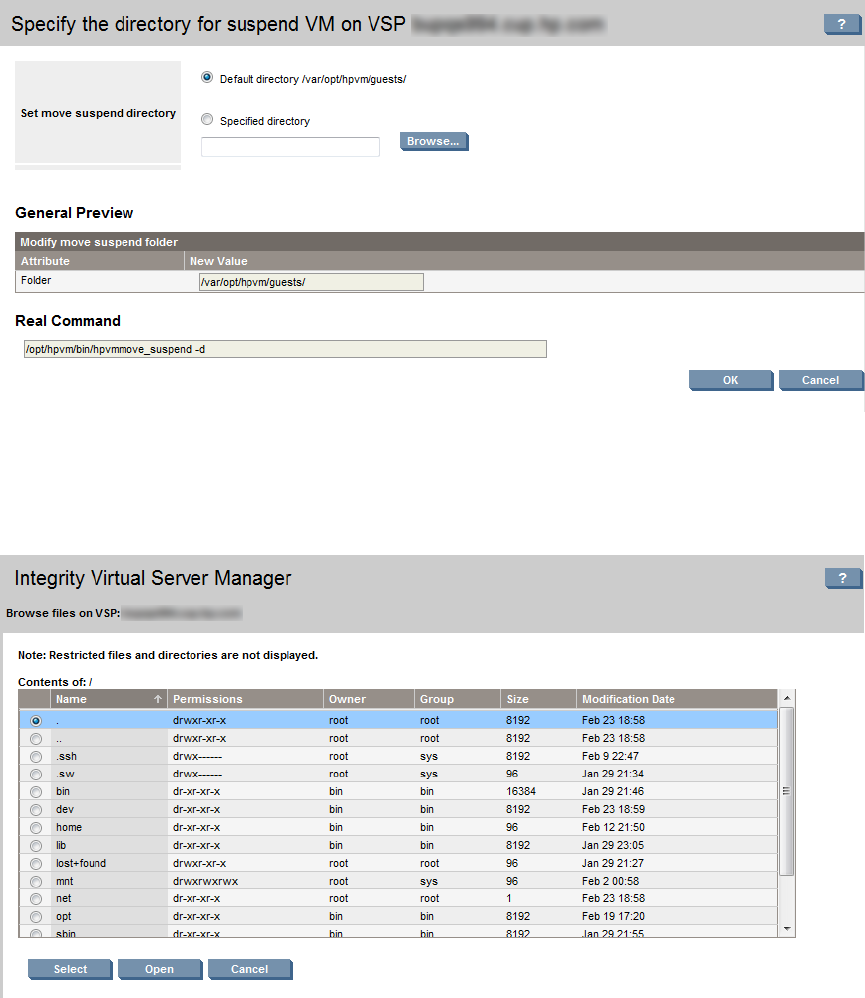
1. Select Tools VM Move Suspend. The screen to specify the new directory is displayed, as shown
in Figure 66
Figure 66 Virtual Machine move suspend
2. To change the default directly, select the Specified directory option and click Browse.
The screen listing all the directories is displayed, as shown in Figure 67.
Figure 67 Virtual machine browse directory
3. Select a directory and click Select. The screen goes back to the VM Move Suspend page.
4. The Command Preview field displays the specified directory location.
Click OK to move the suspended files to the specified directory.
Creating virtual switches
Create Virtual Switch menu is applicable for both VMs and vPars. To provide network access for
VMs or vPars, you must create virtual network switches (vswitches) for them. This section describes
how to create a new vswitch on the VSP. The vswitch is used by a VM or vPar to connect to the
network: one or more VMs or vPars connect to the vswitch and the vswitch is connected to a VSP's
physical network device.
100 Working with VMs or vPars


