
HP LaserJet P4010 and P4510 Series - User Guide
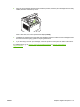

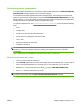


Table Of Contents
- Product basics
- Control panel
- Software for Windows
- Supported operating systems for Windows
- Supported printer drivers for Windows
- HP Universal Print Driver (UPD)
- Select the correct printer driver for Windows
- Priority for print settings
- Change printer-driver settings for Windows
- Software installation types for Windows
- Remove software for Windows
- Supported utilities for Windows
- Software for other operating systems
- Use the product with Macintosh
- Software for Macintosh
- Use features in the Macintosh printer driver
- Connectivity
- Paper and print media
- Use product features
- Print tasks
- Manage and maintain the product
- Print the information and show-me-how pages
- Use the HP Easy Printer Care software
- Use the embedded Web server
- Use HP Web Jetadmin software
- Use security features
- Manage supplies
- Replace supplies and parts
- Install memory, internal USB devices, and external print server cards
- Clean the product
- Upgrade the firmware
- Solve problems
- Solve general problems
- Restore factory settings
- Interpret control-panel messages
- Jams
- Solve print-quality problems
- Solve performance problems
- Solve connectivity problems
- Solve common Windows problems
- Solve common Macintosh problems
- Solve Linux problems
- Supplies and accessories
- Service and support
- Specifications
- Regulatory information
- FCC regulations
- Environmental product stewardship program
- Protecting the environment
- Ozone production
- Power consumption
- Toner consumption
- Paper use
- Plastics
- HP LaserJet print supplies
- Return and recycling instructions
- Paper
- Material restrictions
- Disposal of waste equipment by users in private households in the European Union
- Chemical substances
- Material Safety Data Sheet (MSDS)
- For more information
- Declaration of conformity
- Safety statements
- Index

6. Align the print cartridge with the tracks inside the product, insert the print cartridge until it is firmly
seated, and then close the top cover.
After a short time, the control panel should display Ready.
7. Installation is complete. Place the used print cartridge in the box in which the new cartridge arrived.
See the enclosed recycling guide for recycling instructions.
8. If you are using a non-HP print cartridge, check the product control panel for further instructions.
For additional help, go to
www.hp.com/support/hpljp4010series or www.hp.com/support/
hpljp4510series.
ENWW Replace supplies and parts 119