
6.1 HP IBRIX X9000 Network Storage System Installation Guide (TA768-96058, June 2012)


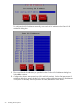


8. The wizard now validates the information you have entered. It performs the following tests:
• Pings the active OA.
• Verifies the OA password.
• Verifies that that OA at that IP address is the active OA.
If any of these tests fail, verify the configuration of the OA and VC modules as described on
the failure report displayed on the GUI. If you need to re-enter the IP address for the OA, select
Back to return to the Confirming Onboard Administrator and Virtual Connect Settings dialog
box, where you can make your changes.
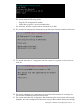
NOTE: If the initialization of the credential manager fails, the GUI displays a message asking
you to initialize the credential manager manually. See “Credential Manager initialization
failed” (page 76) for more information.
9. The wizard now verifies the OA firmware.
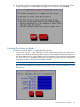
10. Set the iLO IP addresses. On the Get iLO IP Addresses dialog box, select the method you want
to use to set up iLO IP addresses. Use the space bar to select/deselect the check boxes.
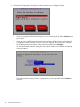
To configure the iLO IP addresses in sequence, enter the first iLO IP address on the Set iLO IP
Addresses dialog box. For example, if 172.16.3.1 is the starting iLO IP address, the installer
sets the iLO IP addresses in the range 172.16.3.1 to 172.16.3.16 by incrementing 1 to the
last octet of the IP address.
Starting the installation and configuring the chassis 53