
HP Designjet Z3100 Printing Guide [PS Driver] - Proof the output on the monitor [Windows]

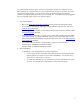


5. Configure the QuarkXPress color Preferences, Edit menu > Preferences… > Color
Manager pane (left hand menu under Default Print Layout option):
• Check the Black Point Compensation checkbox.
• Source Options > Source Setup: Select your custom Source Setup.
• Soft Proofing > Proof Output: Select your custom Output Setup.
• Soft Proofing > Rendering Intent: Select Perceptual.
NOTE The default setting is Absolute Colorimetric. Many colors experts consider this
option the best one when the proofing device (monitor) has a wider color gamut than
the output device (printer), as is the case, for example.
• Select OK.
6. Open your project, File menu > Open..., and browse to it. To insert images, draw a box with
the Rectangle Picture Box and insert the image, File menu > Import Picture...:
7. So that you get a good display select the image, and then, Item menu > Preview
Resolution: Full Resolution.
8. Proof the output on your monitor; View menu > Proof Output > Choose the name of your
custom Output Setup, in this case “ana”.
9. You can now retouch your image and the monitor will show you how it’s going to look once
you’ve printed it.
6