
HP Designjet 4500 Series - User Guide


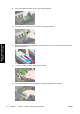


9. Lift up the setup printhead until it is released from the carriage assembly. Then remove the
other setup printheads.
10. Remove the blue protective cap and the clear protective tape from the printhead.
11. Lower all the printheads vertically into their correct positions.
12. Seat the printheads slowly and carefully.
13. Make sure the printheads are correctly seated. When all the printheads are installed, the front
panel prompts, “Close printhead cover and window”.
ENWW Install the printheads 73
How do I... (printer
assembly topics) [4500]