
HP P6000 EVA Updating Product Software Guide (XCS 11001100) (5697-2328, November 2012)


3. Clear the Capture performance data check box. To collect switch performance data, leave
this option selected. Selecting this option will increase the amount of time required to collect
the switch data.
4. Select the Mask IP address check box if you do not want to send the IP address information
(in the raw report) outside your network.
5. Select a format for the report by selecting HTML Report, Microsoft Excel Report, or both.
6. Under Data Collection, click Start. If you selected the option to collect switch performance
data, it will take 10 additional minutes to collect the data.
7. Select Default Mail Client in the Launch Mail Client panel. The location of the report is displayed
in the message body of the default mail launched.
8. Manually attach the raw report created with the subject line: “HP Essentials SAN Visibility
Report Request”. Send the report to the email address: SAN_Visibility@hp.com. An automated
email response is returned, confirming receipt of the raw data file.
Click Close.
The data is processed and the formatted report returned to you within one business day.
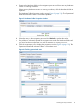
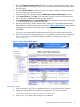
9. When you receive the formatted report, save it to a temporary location on the management
server or any server on which SAN Visibility is installed. A sample report is shown in
Figure 5 (page 19).
Figure 5 Sample SAN Visibility report
Reading the report
1. Save the attached .hppr file to a preferred location. Do not change the file extension.
2. Double-click the saved file to extract the processed report. The report is stored at:
<Install_Dir>\ExtractedProcessReports\<SAN Name>\
3. Click on the .hppr file to open the report in your browser.
Checking and upgrading your SAN infrastructure 19