
- Hewlett Packard Service Manual


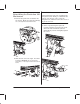


Table Of Contents
- Using this Manual
- Contents
- Safety Symbols
- Chapter 1 Product Information
- Chapter 2 Site Planning and Requirements
- Chapter 3 Installation and Configuration
- Chapter 4 Preventive Maintenance
- Chapter 5 Functional Overview
- Chapter 6 Removal and Replacement
- Chapter 7 Calibrations and Adjustments
- Chapter 8 Troubleshooting
- Chapter 9 Product History and Service Notes
- Chapter 10 Parts and Diagrams
- Chapter 11 Support Services
- Glossary
- Index

6Ć46 Removal and Replacement
C4699Ć90000
Removing the Overdrive
Enclosure
Remove the right endĆcover page 6Ć10.
Remove the spittoon page 6Ć24.
Remove the overdrive roller page 6Ć32.
Remove the indicated two screws from
the right sideĆplate.
Torx-15
This illustration shows the configuration
for the DesignJet 230/250C. The removal
procedure for DesignJet 330/350C is
exactly the same except that the spittoon
has been removed to access the indicated
screws.
Remove the indicated three screws from
the left sideĆplate.
Torx-15
Lift the overdrive enclosure out from the
plotter.
Reassembling: See following procedure.