
DisplayMaker Legacy 72S and 72SR - User Manual


Set the Printhead and Camera Height 5-11
Set the Printhead and
Camera Height
The correct head height is critical to output quality.
◆ Lower head heights reduce overspray, increasing image
quality, but also increase the chance of the printheads strik-
ing the media. Printhead strikes are most likely with adhe-
sive-backed vinyls and cut-sheet rigid media that is not
perfectly flat.
◆ Higher head heights increase overspray, decreasing image
quality, but also decrease the chance of printhead strikes.
As a general rule, use the supplied head height gauges to set the
head height above the media, and do not change it unless you
switch between roll-fed and rigid cut-sheet media.
If you change the printhead height, you should also reset the
height of the “camera” (digital imaging sensor) so that its lens
can focus accurately to perform the automatic calibrations. The
camera is attached to the carriage in a separate enclosure that
can be raised and lowered independently of the printheads.
Checking the service station height and recalibrating it if neces-
sary is also recommended after changing the printhead height.
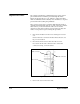
The following procedure shows how to use the supplied gauge(s)
and a Phillips head screwdriver to set the head and camera
heights above the media loaded on the printer.
The printer includes a single gauge for head height on one end,
and camera height on the other end. The head height gauge
locates the head 0.100 inches above the media.
Tip
If you notice an unacceptable change in color
quality after changing the head height, perform a
ColorMark color calibration (“linearization” on a
third-party RIP) or create a new profile.