
DisplayMaker Legacy 72S and 72SR - User Manual


3-12 Capping the Printheads
Do not raise the capping pad beyond this point.
5. Press Proceed.
The control panel displays the Front Page screen. Note that
all but a few functions are disabled until you uncap the
printheads.
Uncap the Printheads Uncapping the printheads is one component of the Wake func-
tion, which reverses the Sleep function:
◆ The printer leaves standby mode: the heaters are switched
on, and the supply & takeup system is tensioned (loaded).
◆ The OHS is enabled, which turns on power to the pumps.
◆ When you manually disengage the capping levers, the cap-
ping pad sensor is detected and the control panel enables all
functions and displays the Sleep key.
Tip
Since some ink may spill from the plastic-wrapped
capping station pad, wear latex gloves to prevent
staining your hands during this procedure.
1. Press the Wake key on the Front Page screen on the control
panel.
The control panel asks you to confirm that you want to
uncap the printheads.
2. Press the
! (Proceed) key to uncap the printheads.
The control panel prompts you to disengage the capping sta-
tion pad.
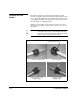
3. Disengage the capping station.
Have a paper towel ready to blot any cleaning fluid that has
escaped from the printheads during capping. If the Capping
Film was applied as directed, most of the fluid should run
off into the drip tray.
Grasp the two capping pad levers, and simultaneously push
them toward the back of the printer to lower the capping sta-
tion.
4. Remove and discard the SolaChrome Capping Film.
Carefully remove the Capping Film to avoid spilling ink on
the floor or yourself.