
User Guide


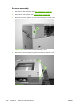


2. Remove one grounding screw (callout 3), disconnect two cables (callout 4), and remove the
cable (callout 5) from the cable stays.
Figure 6-271 Remove the ADF assembly (2 of 3)
NOTE When reinstalling the ADF, make sure that the ADF cable is correctly routed
through the cable holder into the scanner bed.
3. Open the ADF assembly, and lift it up and off of the scanner.
Figure 6-272 Remove the ADF assembly (3 of 3)
CAUTION The ADF assembly is calibrated to work with the scanner on which it is
installed. If the ADF is installed on another scanner, that scanner needs to be calibrated
to work correctly with the ADF. See
Calibrating the scanner on page 104.
404 Chapter 6 Removal and replacement ENWW