
Operation Manual


5
GETTING STARTED WITH YOUR ST9100S
d. The year digits will now be flashing and ‘SET THE YEAR’ will be displayed. To
change the year, press the or buttons until the correct year is shown. The
message ‘IS YEAR OK?’ will be displayed. Press the green button to confirm
the year is correct. If you have made a change, and the date is a valid date, the
message ‘DATE SAVED’ will show, and you can move to the next step. If the date
you set was not valid, for example 31 September, the message ‘INVALID’ will
show and you will be returned to the start of the date setting operation.
e. The time will now be flashing and the message ‘SET THE TIME’ will be displayed.
To change the time, press the or buttons until the correct time is shown.
Each press of the button will change the time by one minute. Holding the button
down for more than a few seconds will change the time slowly at first, then
quickly. The message ‘IS TIME OK?’ will be displayed. Press the green button
to confirm the time is correct. If you have made a change, the message ‘TIME
SAVED’ will show, followed quickly by ‘DATE + TIME COMPLETE’.
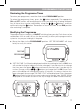
f. Move the slider to the RUN position, to complete setting the date and time.
Note: if the slider is moved at any time before the date and time have been set
correctly, the message ‘DATE UNCHANGED’ will be displayed briefly, and your
changes will not be saved.
Step 2: Running a Built-in Programme
With the date and time correct, your ST9100S Timer will now be operating to the
built-in programme. This has been designed to provide heating at typical times
throughout the day, but if you want to customise the settings, please see the next
section ‘PROGRAMMING YOUR ST9100S’ (page 6).