
Installation Instructions


Installation Guide 5
2.2.3 Locating the Room Thermostat
While still in the Test Mode, as described in section 2.2.2, the room thermostat should be located taking
the following into consideration and reviewing the illustrations below:
1.
Find a suitable location where the signal transmission is reliable. Reliable transmission is indicated when
the relay box is flashing the green LED every 6 seconds. NOTE: The relay box relay will be off.
2. Install the room thermostat on the wall using the wall bracket as shown in the diagram below.
3.
Exit the Test Mode by pressing the AUTO or OFF button.
2.3 System Check
Now a simple test can be completed to check the full system has been installed correctly:
1.
Press the OFF button.
2.
Check the boiler supply is on and check that the green LED on the relay box is off.
3. Press the MAN button.
4.
Adjust the setpoint up to the maximum (35°C) by pressing the button. The boiler should come on
(green LED ON on relay box) after a few seconds and the symbol appears on the room thermostat
LCD display.
5. Press the OFF button. The boiler will go off (green LED OFF on relay box) after a few seconds and the
symbol disappears.
6.
Check the system operation by alternately pressing the MAN and OFF buttons several times, bearing
in mind the switching delay referred to above.
Now, you should have completed the installation successfully - to begin operating at the default factory
settings press the AUTO button or press PROG to modify the built-in heating program accordingly.
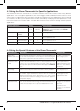
Wall bracket
•Theroomthermostatshouldbeinstalledinanopenspaceforbestperformanceasitisaradiofrequencydevice.
•
Leave at least 30cm distance from any metal objects including wall boxes and at least 1 metre from any other
electrical equipment eg. radio, TV, PC etc.
•Donotmountontometalwallboxes.•Itisrecommendedthattherelayboxisfullyinstalled.
✓
✗
✗
1.2m