
Owner's Manual


14
NOTICE
Fuel can damage paint and some types of plastic. Be careful not to
spill fuel when filling your fuel tank. Damage caused by spilled fuel is
not covered under your DISTRIBUTOR’S LIMITED WARRANTY (see
page 21
).
Never use stale or contaminated gasoline or oil/gasoline mixture.
Avoid getting dirt or water in the fuel tank.
1. Remove the fuel tank cap.
2. Add fuel to the bottom of the red fuel level gauge in the neck of the
fuel tank. Do not overfill. Wipe up spilled fuel before starting the
engine.
3. After refueling, tighten the cap until it clicks.
Move at least 10 feet (3 meters) away from the fueling source and
site before starting the engine.
Fuel Storage Container
Store your gasoline in a clean, plastic, sealed container approved for
fuel storage. Close the vent (if equipped) when not in use, and store
the container away from direct sunlight. If it will take more than 3
months to use the fuel in the container, we suggest adding a fuel
stabilizer to the fuel when you fill the container.
If you have some fuel left in your storage container at the end of the
season, the Environmental Protection Agency (EPA) recommends
adding the gasoline to your vehicle's gas tank
(http://epa.gov/reg5oair/mobile/winter.html).
CHARGING THE BATTERY (HZA Model)
The lawn mower does not have an internal charging system. A plug-in
charger is provided to recharge the battery.
To assure maximum reliability, the battery should be charged:
• Before prolonged storage
• Anytime you notice a decrease in starter motor speed
• At the beginning of the mowing season
Charge the battery in a dry, well-ventilated area where the
temperature is moderate.
WARNING: Battery posts, terminals, and related accessories contain
lead and lead compounds. Wash hands after handling.
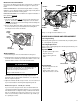
1. Remove the battery cover by depressing the tabs located on the
sides and releasing the tab on top of the battery cover.
2. Disconnect the battery connector by depressing the connector tab
and pulling the battery connector from the harness connector,
which is located inside the battery case, above the battery.
3. Connect the battery connector to the charger supplied with the
mower.
NOTICE
Do not attempt to charge the battery with any charger other than the
one supplied with the mower. Use of a charger other than the one
supplied may result in damage to the electrical system or fire.
4. Plug the charger into a standard 120 Vac power outlet and let the
battery charge for 20 to 24 hours. The charger may become
slightly warm during charging. This is normal.
NOTICE
Do not charge the battery for more than 24 hours or the battery
may be damaged. Disconnect the battery charger from the battery
before storing the lawn mower.
5. After the battery has charged, disconnect the charger and
reconnect the battery connector to the harness connector.
6. Replace the battery cover. Do not operate without the battery
cover installed.
WARNING
Gasoline is highly flammable and explosive, and you can
be burned or seriously injured when refueling.
• Stop engine and keep heat, sparks, and flame away.
• Refuel only outdoors.
• Wipe up spills immediately.
MAXIMUM FUEL
LEVEL
FUEL LEVEL
GAUGE
WARNING
A battery can explode if you do not follow the correct
procedure, seriously injuring anyone nearby.
Keep all sparks, open flames, and smoking materials away
from the battery.
X
40
40
TABS
BATTERY
COVER
BATTERY
CONNECTOR
HARNESS
CONNECTOR
CONNECTOR
TABS
X
40
BATTERY
CHARGER
BATTERY
CHARGER
CONNECTOR
PLUG INTO A
STANDARD
120 VAC
POWER
OUTLET.
BATTERY
CONNECTOR
HARNESS
CONNECTOR