
Operation Manual


6
English
(1) Attaching and detaching nose cap
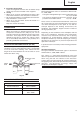
The nose cap can be attached by simply pressing it
into the push lever.
Press it in until a convex part inside the nose cap
enters into a hole of the push lever. (Fig.11)
Fig. 11
For removal, insert a thin rod such as a screw driver
into the gap on the back of the push lever, and then
pull it out. (Fig.12)
Fig. 12
(2) Safekeeping of nose cap
Put the removed nose cap in a space behind the
magazine for safekeeping. (Fig.13)
Fig. 13
3. Adjusting the nail-driving depth
CAUTION:
When making adjustments, be sure remove your
finger from the trigger. When making adjustments,
be sure that the nail outlet is not facing downward
and that body parts or other persons are not in the
path of the nail outlet.
䡬 Adjusting the adjuster (Fig. 14)
Carry out test driving. If the nails are too deep, turn
the adjuster to the shallow side (
mark).
If the nail depth is too shallow, turn the adjuster to
the deep side (
mark) (see Fig. 14, 15).
Depth is changed 1 mm with each rotation of the
adjuster.
Fig. 14
Fig. 15
NOTES:
䡬 When adjusting the adjuster, it does not rotate more
than 3 mm from the deepest point where a nail goes
down. Do not rotate the adjuster by force beyond
that point.
䡬 The nail-driving depth can also be adjusted by
changing the air pressure used. Carry this out together
with movement of the adjuster. Using a high air
pressure that does not match the nail-driving
resistance will shorten the life of this nailer.
4. Changing the exhaust direction
The direction of the exhaust vent can be changed
within 360° by turning the top cover. (Fig. 16)
Fig. 16
Nose
Hole
Protruding Section
(inside)
Push Lever
Push Lever
Slotted-head Screw Driver
Nosecap (A)
Magazine
Adjuster
ShallowDeep
Flush
Too shallow
Too deep
Top Cover
Exhaust
Vent
Adjustable range of
exhaust direction
Nose cap
(A)
Nose cap (A)