
Instruction Manual


123
English
QR34962
ARRANGING ORDER OF SCENES (MOVE)
You can move scenes only when “Category: All” is specified.
1Press the DISC NAVIGATION button.
2Press the MENU button.
3Choose “Switch” on the “PlayList” menu screen,
and then press the button.
4Select the scene to be moved.
5Press the MENU button.
6Choose “Scene”, “Edit”,
“Move”, and then press
the button.
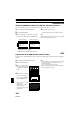
7The “Move Scenes”
screen will appear: If you
ar e sur e you want to move
the scene, press the button.
If you want to change the scene to be moved, you
can change it on this screen.
8Move the “ ” mark to the
position where you wish
to move the scene, and
then press the
button.
9The screen for verifying
move will appear: Choose
“YES”, and then press the
button.
Choose “NO” to cancel
move.
After Yes or No setting, the scene select screen
will be restored.
Repeat steps 7 - 9 to move another scene.
10
Press the button to quit.
Note:
• IfyoupresstheMENUbuttonbeforepressingthe
button in step 7, the submenu screen will appear.
• You can also move multiple scenes (P.98).
• Stills can also be moved.
• Only scenes on play list can be moved.
Scene
RAM
ENTER RETURN
Delete
Ed i t
Copy
Select
Det a i l
Thu
m
bna i l
Skip
Fade
Co
m
bine
Divide
M
ove
ETC
Select I nsert Point 006/019
RAM
ENTER CANCEL
ENTER
Move scenes?
Move Scene
YES NO