
Operation Manual


10
Adjusting the projector’s elevator
When the place to put the projector is slightly uneven to
the left or right, use the elevator feet to place the projector
horizontally. Using the feet can also tilt the projector
in order to project at a suitable angle to the screen,
elevating the front side of the projector within 9 degrees.
This projector has 2 elevator feet and 2 elevator buttons.
An elevator foot is adjustable while pushing the elevator
button on the same side as it.
1.
Holding the projector, push the elevator buttons to
loose the elevator feet.
2.
Position the front side of the projector to the desired
height.
3.
Release the elevator buttons in order to lock the
elevator feet.
4.
After making sure that the elevator feet are locked,
put the projector down gently.
5.
If necessary, the elevator feet can be manually
twisted to make more precise adjustments. Hold the
projector when twisting the feet.
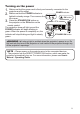
Adjusting the lens position
Shifting the lens position shifts the projection
position.
After pressing the LENS SHIFT button on the
control panel or the remote control, use the
cursor buttons to shift the lens position.
CAUTION ►
Do not put your ngers or any other
things around the lens. The moving lens could catch
them in the space around the lens and result in an injury.
NOTE • The projector may ignore operation by buttons while moving the lens.
• Generally, better image quality can be got when the lens is set to the center.
LENS SHIFT
button
To loose an
elevator foot,
push the elevator
button on the
same side as it.
To nely
adjust, twist
the foot.
LENS SHIFT button
CAUTION ►Do not handle the elevator buttons without holding the
projector, since the projector may drop down.
►Do not tilt the projector other than elevating its front within 9 degrees using
the adjuster feet. A tilt of the projector exceeding the restriction could cause
malfunction or shortening the lifetime of consumables, or the projector itself.
Only for CP-X8160, CP-WX8255 and CP-WU8450, it is possible to install the
projector for any direction with speci ed mounting accessories. Consult with
your dealer about such a special installation.