
Operating Instruction DD AF-CA H (01)


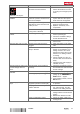


Table Of Contents
- Original operating instructions
- 1 Information about the documentation
- 2 Safety
- 3 Description
- 4 Technical data
- 5 Preparations at the workplace
- 6 Types of work
- 7 Care and maintenance
- 8 Transport and storage
- 9 Troubleshooting
- 10 Disposal
- 11 Manufacturer’s warranty
- 12 FCC statement / ISED statement
- 13 Further information
- Mode d'emploi original
- 1 Indications relatives à la documentation
- 2 Sécurité
- 3 Description
- 3.1 Éléments constitutifs de l'appareil et organes de commande
- 3.2 Utilisation conforme à l'usage prévu
- 3.3 Autocollants d'avertissement sur le produit
- 3.4 Bluetooth®
- 3.5 Symboles d'affichage dans l'affichage multifonctions (à la mise en service)
- 3.6 Symboles d'affichage sur l'affichage multifonctions (état de fonctionnement normal)
- 3.7 Éléments livrés
- 3.8 Bouton d'arrêt d'urgence
- 4 Caractéristiques techniques
- 5 Préparatifs
- 6 Travail
- 7 Nettoyage et entretien
- 8 Transport et entreposage
- 9 Aide au dépannage
- 10 Recyclage
- 11 Garantie constructeur
- 12 Déclaration FCC/Déclaration ISED
- 13 Informations complémentaires
- Manual de instrucciones original
- 1 Información sobre la documentación
- 2 Seguridad
- 3 Descripción
- 3.1 Componentes de la herramienta y elementos de manejo
- 3.2 Uso conforme a las prescripciones
- 3.3 Etiquetas de advertencia en el producto
- 3.4 Bluetooth®
- 3.5 Símbolos mostrados en la pantalla multifunción (durante la puesta en servicio)
- 3.6 Símbolos mostrados en la pantalla multifunción (estado de funcionamiento normal)
- 3.7 Suministro
- 3.8 Interruptor de parada de emergencia
- 4 Datos técnicos
- 5 Preparación del trabajo
- 6 Procedimiento de trabajo
- 7 Cuidado y mantenimiento
- 8 Transporte y almacenamiento
- 9 Ayuda en caso de averías
- 10 Reciclaje
- 11 Garantía del fabricante
- 12 Indicación FCC / Indicación ISED
- 13 Más información
- Manual de instruções original
- 1 Indicações sobre a documentação
- 2 Segurança
- 3 Descrição
- 3.1 Componentes e comandos operativos
- 3.2 Utilização correcta
- 3.3 Autocolantes de aviso no produto
- 3.4 Bluetooth®
- 3.5 Símbolos de visualização no visor multifunções (ao iniciar a utilização)
- 3.6 Símbolos de visualização no visor multifunções (estado normal de funcionamento)
- 3.7 Incluído no fornecimento
- 3.8 Interruptor de paragem de emergência
- 4 Características técnicas
- 5 Preparação do local de trabalho
- 6 Trabalhar
- 7 Conservação e manutenção
- 8 Transporte e armazenamento
- 9 Ajuda em caso de avarias
- 10 Reciclagem
- 11 Garantia do fabricante
- 12 Declaração FCC / Declaração ISED
- 13 Mais informações

10 English 2299965
*2299965*
6.1.4 Drilling in CUT-ASSIST mode
This section describes the procedure for a typical drilling operation in CUT-ASSIST mode.
The following preconditions must be fulfilled:
• The auto-feed unit is mounted correctly on the drill stand.
• The auto-feed unit and the diamond core drilling machine are paired and the Bluetooth connection
is established.
• The continuous-running lock on the diamond core drilling machine is activated.
•
The drilling operation has been started by pressing the button.
1. A "Surface search in progress" message appears on the display.
▶ The drilling system searches for the surface of the material to be drilled.
▶ The drilling system detects the surface.
2. The drilling system switches the cooling water supply on.
3. The drilling system starts drilling in hole-starting mode.
4. The drilling system switches to normal mode and carries out the drilling operation.
▶ The current drilling depth is shown on the display.
5. On detecting a break-through or a depth-gauge stop, the drilling system returns to its initial position.
▶ The diamond core drilling machine switches off.
▶ The cooling water supply is shut off.
The drilling depth displayed is the totaled drilling depth since the last break-through detection
without depth-gauge stop detection. Drilling progress between two consecutive detections equals
the total depth of a drillhole.
The information is displayed until a new drilling operation after a break-through detection or a
depth-gauge stop detection is started.
6.2 Viewing drilling statistics (during and after the drilling operation)
In CUT-ASSIST mode, the analysis data of the diamond core drilling machine are supplemented by analysis
data of the auto-feed unit. You can call up the analysis data in the following situations:
• During the drilling operation.
• After the drilling operation (EMERGENCY STOP switch pressed)
Call up the analysis data by pressing the button. To browse through the analysis data, repeatedly press
the button.
The read-out disappears automatically after 30 seconds.
Analysis data of the auto-feed unit
Reset the 'Last Job' counter: You can manually reset all day counters (identifiable by the symbol)
of the available analysis data to 0:
•
Press the button and hold it down for at least 5 seconds.
You can call up the following analysis data on the auto-feed unit:
Display Explanation
This shows you the operating modes (hand-held, rig-based, with auto-
feed unit) in which the diamond core drilling machine was operated
(figures are percentages since the last reset of the counter).