
User Manual


UM DS-90xxHUHI-F8/N User Manual 041717NA 126
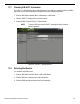
3. Click the One-touch Create button to enter the One-touch Array Configuration interface.
Figure 201 One-Touch Array Configuration
4. Edit the array name in the Array Name text filed and click OK button to start configuring array.
NOTE: If you install four HDDs or above for one-touch configuration, a hot
spare disk will be set by default. It is recommended to set a hot spare
disk to automatically rebuild the array when the array is abnormal.
5. When the array configuration is done, click the OK button in the pop-up message box to finish.
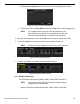
6. You can click Array tab to view the information of the successfully created array.
NOTE: By default, one-touch configuration creates an array and a virtual disk.
Figure 202 Array Settings Interface
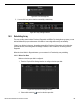
7. A created array displays as an HDD in the HDD information interface.
Figure 203 HDD Information Interface
18.1.5. Manually Creating Array
You can manually create the array of RAID 0, RAID 1, RAID 5, RAID6 and RAID 10.
NOTE: In this section, we take RAID 5 as an example to describe manually
configuring arrays and virtual disks.
1. Enter the Physical Disk Settings interface, Menu > H
DD > RAID > Physical Disk.