
Installation Guide


65
BEGIN
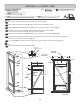
Center OO vertically on door in the door opening (Fig. A) 1" from edge of door (Fig. B).
1
PARTS REQUIRED:
x6
2" (5,1 cm)
EAVE WALL - R.H. DOOR STIFFENER/ THRESHOLD/ WEATHER STRIP
You have nished installing your weatherstrip and threshold.
FINISH
6
Secure using (6) 2" screws through outside trim into OO (Fig. B)
2
Fig. A
Center OO
in door
opening.
Center metal threshold on oor in door opening
and secure using 3/4" special coating screws
into oor as shown (Fig. C).
3
Working inside shed with door held closed, install
weatherstrip LRA ush to metal threshold at bottom
of door (Fig. D).
Hold LRA tight against inside of door (Fig. D).
Secure LRA using 2" nish nails into right door frame
as shown.
4
5
Repeat STEP 4 to install LRA on other side of door opening.
OO
x1
1-1/4 x 2-1/2 x 69" (3,2 x 6,3 x 175,3 cm)
2"
(5,1 cm)
Screws
x6
14" (35,6 cm)
Approximately
1"
(2,5 cm)
2" Screws
(5,1 cm)
Fig. B
OO
IT IS
IMPORTANT
TO HOLD
THIS
DIMENSION
Fig. C
x1
32" Metal Threshold
3/4" (1,9 cm) x6
Bagged seperately / special coating
(6) Special Coating Screws
LRA
x2
1 x 4 x 69-3/4" (2,5 x 10,2 x 177,2 cm)
x20
2" (5,1 cm)
2"
(5,1 cm) Finish
Nails
x20
Flush
Metal Threshold
Door Frame
Flush
Flush
LRA
INSIDE
OF
DOOR
OO
Fig. D