
Instructions / Assembly


ASSEMBLY INSTRUCTIONS (CONT.):
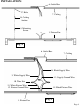
STEP A - Using both hands, grasp the sides of the Acrylic Lens (#4)
at the center and hold it over your head. Angle the Acrylic Lens (#4)
into the Moveable End Cap (#5). (Fig. 2)
STEP B - Push the Acrylic Lens (#4) into the Moveable End Cap
(#5) to move it about ½”. (Fig. 2)
STEP C - While applying pressure to the Moveable End Cap (#5), tilt
the other end of the Acrylic Lens (#4) toward the Fixture Pan (#1)
until it aligns with the Fixed End Cap (#19). If necessary, push the
Acrylic Lens (#4) harder into the Moveable End Cap (#5) to allow
the Acrylic Lens (#4) to clear the Fixed End Cap (#19). (Fig. 2)
STEP D – Release the pressure on the Moveable End Cap (#5) and
allow the Acrylic Lens (#4) to slide into the Fixed End Cap (#19).
(Fig. 3)
3. Before continuing Assembly, please proceed to the Installation
Instructions.
4. Insert 25W or 30W T8 Fluorescent Light Bulbs (#2) (not included)
into the provided Lamp Sockets (#3). Turn each Fluorescent Light
Bulb (#2) ¼ turn, until there is a click. (Fig. 1)
5. Re-attach the Acrylic Lens (#4) to the Fixture Pan (#1).
Page 5