
Installation and User Manual


18 49-1000557 Rev. 0
ACCESSORY
ENGLISH
WATER VALVE ASSEMBLY ·ÌØ×ݸ
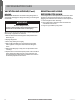
ATTACH THE WATER VALVE (Cont.)
¿ Open the outlet box cover,
located on the right side of the
back of the unit, with flat head
screw driver.
¿ Check the water line
connection. Make sure the
water tube is fully inserted
into the grommet. If not,
loosen the hose clamp by
squeezing the ends with pliers
and insert the tube as far as
it can go. Then release the
clamp ends and make sure
that the clamp captures
the water tube. Otherwise,
water may leak from this
connection.
¿ Check the rear of the
refrigerator to make sure
the fill tube has not been
pushed out of the back of
the refrigerator.
WATER LINE CONNECTED
Refer to the Water Line Installation Instructions for
connection to the home water supply in the installation
instructions that came with your icemaker.
After water line installation is completed, set the
icemaker power switch to ON.
The icemaking cycle will not begin until the icemaker
and freezer compartment reach operating temperature,
then icemaking will begin automatically.
REINSTALL THE COVER
Reinstall the access cover.
This requires using the
screws you removed
previously to reattach the
cover to the back of the
refrigerator case. This
must be reinstalled for your
refrigerator to function
properly. The water line
should come out at the water
tube relief slot at the right
side of the access cover.
Water
Line
Fill tube
grommet
Clamp
Water tube
Outlet Box
READ AND SAVE THESE INSTRUCTIONS