
Installation guide


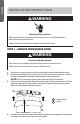


16½"
(41.9 cm)
a
A
Center
Line
STYLE 2 - FRAMED, RECESSED CABINET
IMPORTANT: The microwave must be level. Use a carpenter’s level to make
sure the cabinet bottom is level.
1. Draw a vertical line on the wall at the center of the 24" (61 cm) wide opening.
2. Place the Mounting Plate/Rear Wall Template onto the wall so that the
centerline of the template is aligned with the center line, and the top of the
template is touching the bottom of the cabinet. Tape the template in this
position.
a
3/
8
"
TO
E
D
GE
NO
T
E: IT IS VERY I
MP
O
RTANT
T
O
RE
AD AND
FO
LLOW
T
HE DI
RECTIONS
I
N
THE
INSTAL
LA
TION I
NSTRUCT
IONS
BE
F
ORE
PROCE
EDING
WIT
H THIS
REAR WAL
L TE
MPLATE.
This Rear Wa
l
l Temp
l
a
te serves to positio
n
the bot
tom
mountin
g plate and to locate t
h
e
ho
rizon
tal exh
aust
ou
tl
e
t
.
1. U
se a
level
to
che
ck t
hat th
e
templ
ate is positioned
a
cc
urately.
2. L
ocate a
nd ma
rk
a
t
least one stud on t
h
e l
eft
o
r
right s
ide
of t
h
e cen
te
rl
i
ne.
It
is
i
mportant
to use a
t least
o
ne w
o
od
scr
e
w
m
ounte
d
f
irmly i
n
a stud to sup
port the w
e
ight
of the mi
cr
ow
ave
. M
a
rk two additi
onal
, e
ve
nl
y sp
a
ced
l
o
ca
tio
ns for
th
e
suppli
e
d
t
oggle
b
ol
ts
.
3
.
D
rill
h
oles
in
th
e
mar
ked lo
cat
ions. Wh
e
r
e there is
a stud, d
ri
ll a 3/
1
6"
ho
le
for
w
oo
d scr
ews.
For
hole
s
t
hat d
o n
ot l
ine up with
a st
u
d, d
rill 5/8
" hol
es f
or
to
ggle
b
o
l
ts.
DO
N
OT I
N
STALL TH
E M
OUN
T
IN
G PLAT
E
AT TH
IS TIME
.
4
.
Remo
ve
the template
from the re
ar wal
l.
5. Re
view
the Installa
tion Instruction
book for your
installatio
n si
t
uati
on.
Loc
ate
and mark holes to al
i
gn wi
t
h h
ole
s i
n
the
mou
nt
i
ng plate.
I
MPORTANT:
LOCATE AT LEAST
ONE S
T
UD
ON EITHE
R
S
IDE
OF
T
HE CENTER
LINE.
MARK
T
HE LOC
A
T
ION FOR
2 A
D
DITIONAL,
E
VENLY
SPA
CE
D
TOGGLE
BOLTS
IN
TH
E MOU
NT
ING
PL
ATE
AREA.
Locate
and
ma
rk
holes to ali
gn with hole
s in
the
moun
t
ing pl
at
e.
IMP
O
RTA
NT:
LOCA
TE
A
T LE
AST
ONE
STUD ON EI
THER S
IDE OF
THE
CE
NTERLI
NE.
MA
RK
THE LOC
ATI
O
N
F
O
R 2
ADDIT
I
ONAL,
EV
ENL
Y
SPACE
D
TO
GG
LE
BOLT
S
I
N
THE MOUNT
ING PLATE
ARE
A.
Trim
the re
ar
w
a
ll temp
late al
ong the do
tted lin
e.
T
rim th
e
rea
r wall temp
l
ate al
on
g t
he
dotted
l
ine.
12"
4"
Da
rl
e
v
uelta a la hoja pa
r
a
co
nsulta
r
la
versión
en Es
pa
ñ
ol.
b
A
Center Line
B
30" (76.2 cm) to
cooktop
STYLE 3 - RECESSED CABINET WITH FRONT OVERHANG OR
DECORATIVE TRIM
IMPORTANT:
•
The microwave must be level. Use a carpenter’s level to make sure the
cabinet bottom is level.
•
If a decorative cabinet trim is interfering with the installation and leveling of
the microwave oven, remove the decorative trim.
•
If the cabinets have a front overhang, but no back or side overhang, to keep
the microwave level, place the mounting plate so that the distance from the
top of the mounting plate to the cabinet bottom is equal to the distance
from the bottom of the front overhang to the bottom of the cabinet.
8
ENGLISH