
User's Manual

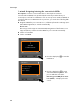


Table Of Contents
- Gigaset DX800A all in one - your perfect companion
- Base overview
- Display icons
- Contents
- Safety precautions
- First steps
- Operating the base
- Menu tree
- Making calls
- Making calls using network services
- Using lists
- Using directories
- Using the local base directory
- Directory entries
- Saving number(s) in the directory - new entry
- Order of directory entries
- Searching for a directory entry
- Dialling with the directory
- Managing directory entries
- Exchanging directory/entries with handsets
- Transferring the directory/entries as a vCard with Bluetooth
- Receiving a vCard with Bluetooth
- Adding a displayed number to the directory
- Copying a number or e-mail address from the directory
- Saving an anniversary in the directory
- Using online directories
- Using the private net directory
- Using the Gigaset.net directory
- Using the local base directory
- Making cost-effective calls
- E-mail notifications
- Info centre - continuous Internet access from your phone
- Operating the base's answering machine
- Operating via the base
- Activating/deactivating and setting answering machine mode
- Recording a personal announcement/advisory message
- Playing back announcements
- Deleting announcements/advisory messages
- Playing back messages
- Deleting messages
- Accepting a call from the answering machine
- Diverting an external call to the answering machine
- Activating/deactivating two-way record
- Activating/deactivating call screening
- Setting the recording parameters
- Operating when on the move (remote operation)
- Operating via the base
- Using the network mailbox
- ECO DECT: Reducing energy consumption and radiation
- Setting an appointment (calendar)
- Setting the alarm clock
- Connecting/using other devices
- Registering handsets
- De-registering handsets
- Locating a handset (paging)
- Making internal calls
- Changing the name of an internal party
- Changing the internal number of an internal party
- Using Bluetooth devices
- Activating/deactivating Bluetooth mode
- Registering Bluetooth devices
- Editing the list of known (trusted) devices
- Rejecting/accepting an unregistered Bluetooth device
- Changing the Bluetooth name of the base
- Using a Bluetooth headset
- Using data devices
- Using GSM mobiles (Link2mobile)
- Simultaneous Bluetooth connections
- Connecting a fax machine
- Connecting and using a wire-bound headset
- Setting up the base
- Configuring the system settings
- Setting the date and time manually
- Protecting against unauthorised access
- Setting your own area code
- Setting the base's IP address in LAN
- Setting up/deleting connections (MSNs)
- Configuring VoIP connections
- Assigning send and receive connections to internal parties
- Updating the phone firmware
- Activating/deactivating the DECT interface
- Activating/deactivating the FAX port
- Restoring the base to the default settings
- Checking the base's MAC address
- Changing the default connection
- Connecting the base to a PABX
- Industry Canada Certification
- FCC / ACTA Information
- Service (Customer Care)
- Environment
- Appendix
- Glossary
- Accessories
- Index

27
First steps
Downloading VoIP provider data
The connection wizard establishes a connection with the Gigaset configuration
server on the Internet. Various profiles with general access data for different VoIP
providers can be downloaded here.
After a brief period you will see the following display:
The general access data for your VoIP provider will be downloaded and saved on
the phone.
A list of countries is loaded.
¤ Press up or down on the control key
repeatedly until the country in
which you wish to use the phone is
selected in the display.
¤ Press the key below
§OK§ on the
display screen to confirm your selec-
tion.
A list of the VoIP providers for which a
profile with the general access data is
available on the configuration server is
displayed.
¤ Press up or down on the control
key qrepeatedly until your VoIP
provider is selected in the display.
¤ Press the key below §OK§ on the
display screen to confirm your selec-
tion.
Select your country
Country 1
Country 2
Country 3
Country 4
Country 5
V
Back OK
Select your Provider
Provider 1
Provider 2
Provider 3
Provider 4
Provider 5
V
Back OK
You have not been able to download your provider's data
If your VoIP provider does not appear in the list, i.e., its general data is not pro-
vided for download, you must cancel the IP wizard:
¤ Briefly press the red end key T repeatedly until Start IP installation wiz-
ard? appears in the display again, and then on the display key
§No§.
You can perform the subsequent steps of the installation wizard.
You must then make the required VoIP provider and IP account settings
using the Web configurator. You receive the general provider data from your
VoIP provider.
You can change the assignment of the VoIP connection as send/receive connec-
tion at a later time via the telephone menu or the Web configurator.