
Product Manual


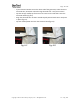


Table Of Contents
- We are happy to double check your installation at no cost and offer any additional adjustment advice or tips. Simply email your pics to support@gentent.com, include your original GenTent.Com order number, or let us know the make and model of your gene...
- Product Registration
- If you purchased from www.gentent.com, your product is already registered. If you purchased from one of our partners, please visit www.gentent.com/register so that we can establish your purchase date and keep you informed of any periodic updates. IMP...
- Limited Three Year Warranty
- Package Contents
- Installation Overview
- Install GenTent Clamps on Generator Frame
- Install GenTent Frame on the GenTent Clamps
- Secure GenTent Canopy over GenTent Frame
- Important GenTent Usage Tips
- GenTent Accessories and Spare Parts Catalog

Page: 12 of 16
Copyright © 2013 GenTent Safety Canopies, LLC – All Rights Reserved V5 – July, 2013
Install GenTent Frame on the GenTent Clamps
- Position Central Connector with vent rod up (fig. 5-A).
- Position side holes so that the shortest distance between holes matches the short side
of your generator.
Note: Each frame rod goes into the Central Connector hole first and then into the
corresponding clamp hole
- Insert a fiberglass frame rod into Central Connector hole until it stops (fig. 5-A).
- Insert other end of the fiberglass rod fully into the correct clamp hole of the
corresponding clamp (Fig. 5-B).
- Insert second fiberglass rod fully into the opposite hole in the Central Connector (fig. 5-
C).
- Grasp the end of this fiberglass rod, bend toward the opposite side clamp and insert
fully into the correct hole (fig. 5-C).
- Repeat for final two fiberglass rods (fig. 5-C).
- Recheck clamps; they should be firmly in place and may exhibit a slight upward lean.
Fig. 5-A Fig. 5-B Fig. 5-C