
User's Manual
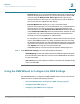


Table Of Contents
- Getting Started
- Wizards
- Using the Startup Wizard
- Using the Wireless Wizard to Configure the Wireless Settings for ISA550W and ISA570W
- Using the DMZ Wizard to Configure the DMZ Settings
- Using the Dual WAN Wizard to Configure the WAN Redundancy Settings
- Using the Site-to-Site Wizard to Establish the Site-to-Site VPN Tunnels
- Using the Remote Access Wizard to Establish the IPSec VPN Tunnels or SSL VPN Tunnels for Remote Access
- Status
- Networking
- Configuring IP Routing Mode
- Port Management
- Configuring the WAN
- Configuring the WAN Redundancy
- Configuring the VLAN
- Configuring the DMZ
- Configuring the Zones
- Configuring the Routing
- Dynamic DNS
- IGMP
- VRRP
- Configuring the Quality of Service
- Address Management
- Service Management
- Wireless Configuration for ISA550W and ISA570W
- Firewall
- Configuring the Firewall Access Rules to Control Inbound and Outbound Traffic
- Configuring the Firewall Schedule
- Firewall Access Rule Configuration Examples
- Configuring the NAT Rules to Securely Access a Remote Network
- Configuring the Session Settings
- Configuring the Content Filtering to Control Access to Internet
- Configuring the MAC Filtering to Permit or Block Traffic
- Configuring the IP/MAC Binding to Prevent Spoofing
- Configuring the Attack Protection
- Configuring the Application Level Gateway
- Security Services
- VPN
- About VPN
- Configuring the Cisco IPSec VPN Server
- Configuring the Cisco IPSec VPN Client
- Configuring the Site-to-Site VPN
- Configuring the SSL VPN
- Elements of the SSL VPN
- Configuration Tasks to Establish a SSL VPN Tunnel
- Installing the Cisco AnyConnect VPN Client on User’s PC
- Importing the Certificates for User Authentication
- Configuring the SSL VPN Users
- Configuring the SSL VPN Gateway
- Configuring the SSL VPN Group Policies
- Configuring the SSL VPN Portal
- Configuring the L2TP Server
- Configuring the VPN Passthrough
- Viewing the VPN Status
- User Management
- Device Management
- Remote Management
- Administration
- SNMP
- Configuration Management
- Firmware Management
- Log Management
- Managing the Security License
- Managing the Certificates for Authentication
- Configuring the Email Alert Settings
- Configuring the RADIUS Servers
- Configuring the Time Zone
- Device Discovery
- Diagnosing the Device
- Measuring and Limiting Traffic with the Traffic Meter
- Configuring the ViewMaster
- Configuring the CCO Account
- Configuring the Device Properties
- Configuring the Debug Settings
- Troubleshooting
- Technical Specifications and Environmental Requirements
- Factory Default Settings
- Where to Go From Here

Wizards
Using the DMZ Wizard to Configure the DMZ Settings
Cisco ISA500 Series Integrated Security Appliance Administrator Guide 50
2
The DMZ Service - Add/Edit window opens.
STEP 2 Enter the following information:
• Original Service: Choose a service as the incoming service.
• Translated Service: Choose a service as the translated service that you will
host. If the service you want is not in the list, choose Create a Service to
create a new service object. To maintain the service objects, go to the
Networking -> Service Management page. See Service Management,
page 154.
• Translated IP: Choose the IP address of your local server that will need to
be translated. You can get the IP address after you connect your local server
to the specified DMZ port. If the IP address you want is not in the list, choose
Create an IP Address to create a new IP address object. To maintain the IP
address objects, go to the Networking -> Address Object Management
page. See Address Management, page 152.
• WAN: Choose either WAN1 or WAN2, or both as the incoming WAN interface.
• WAN IP: Specify the public IP address of the server. You can use the WAN’s
IP address or a public IP address that is provided by your ISP. When you
choose Both as the incoming WAN interface, this option is grayed out.
• Enable DMZ Service: Click On to enable the DMZ service, or click Off to
create only the DMZ service.
• Description: Enter the name for the DMZ service.
STEP 3 Click OK to save your settings.