
Installation guide


Installation
30" Built-b_ ( o_vectio_ Ove_,_
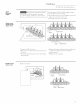
Step 3
Remove
Oven
Door(s)
Caution: Do not lift the ovenorovendoorwitb handle.
Locked
Ne Latch
• ()pen the door lttlly.
• Push hinge latches up to lock hinges in open
position.
• (;rasp each side of door and pull the door straight
out and away fi-om tlle oven.
• I.ay the oven door on packaging to prevent
scratching.
Step 4
Route
cable
through
cutout
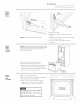
Step 5
Secure
oven
to cabinet
Caution: Oven{s)areveryheavy.2peopleare requiredto lift oven(s)
into theopening.Ovenshavesidebandies.Graspside handlewith one
handand intoovenopeningwith otberband.Lift theovento the
cabinetopening,verycarefully.
With oven in front of cabinet opening:
• Insert power cable into cabinet opening.
• Lift the oven into opening while continuing to rived
the cable in the direction of" the installed junction
box. Be sure the cable does not get pinched between
the back of the oven and cabinet wall.
ShippingBase
• Slide oven into cabinet opening.
• I)rill 3/32" pilot holes into cabinet flame through
mounting holes in oven fl'ont li-ame.
• Secure oven to cabinet with screws fllrnished.
-Single ovens, use 2 screws, one on each side.
-I)ouhle ovens, use 4 screws, 2 on each side.
crews provided. Failur_ to do so could
ause the oven to mo_ or tip dtlFing tlse
tnd result ill p_rsonal il_iur }.
(DO ©
/
] 1