
Owner's manual


14
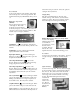
Setting the Paper Size Guides
1. For 4:1 coil 14mm and smaller:
• Place one sheet on your pre-punched (0.2475 Over-sized Oval only) document on the Right Bind Deck.
• Check that the sheet is fully justified against the Spine Formers on
the bind edge. ALL COIL SIZES – all holes must be clear,
properly aligned and visible on the Platen. The tines of the
Platen cannot obstruct any of the holes. It is helpful to lift the
Stripper up and out of the way.
• Check that the sheet is also fully justified against the Edge Guide.
2. For 4:1 coil 16mm and larger:
• Place one sheet of your pre-punched documents on the Right Bind
Deck.
• Check that the sheet is fully justified against the Spine Formers on the bind edge.
• Check that the sheet is also fully justified against the Document Stop.
• Place another single sheet on your pre-punched document on the Left Bind Deck.
• Check that the sheet is fully justified against the Spine Formers on the bind edge.
• Check that the sheet is also fully justified against the Document Stop.
3. Using the Edge Guide Adjustment Knob, adjust the Document Stop so that the pre-punched holes in the sheet are
visible and centered in the middle of the slots of the Platen.
4. For coil 16mm and larger, repeat this process for the Left Bind Deck.
Loading the Document for Binding
After the document has been aligned, you are ready to load the entire document.
1. For coil 14mm and smaller:
• Place the entire document on the Right Bind Deck.
• Check that it is fully justified against the Spine Former on the bind edge and the Document Stop on the bottom
edge.
2. For coil 16mm and larger:
• Place on half of the document on the Right Bind Deck.
• Check that it is fully justified against the Spine Former on the bind
edge and the Document Stop on the bottom edge.
• Place the other half of the document on the Left Bind Deck.
• Check that it is fully justified against the Spine Former on the bind
edge and the Document Stop on the bottom edge.
3. ALL COIL SIZES – all holes must be clear, properly aligned and
visible through the Platen.
4. Place the Document Guide Magnet on the Right Bind Deck.
5. Align the magnet with the middle of the unbound document,
approximately 1/8” from the edge of the document. The magnet will
help prevent the document from skewing as it drops down to the Cut/Crimp Station of the DigiCoil.
Cut/Crimp Knife Height Adjustment
1. Move the Cut/Crimp Knife Height Adjustment Lever to the size of the coil being used to bind the documents, as
indicated by the label next to the Lever.
Cut/Crimp Setup
1. Insert the document to be bound.
2. Press Start.
3. Press the Cut/Crimp Setup button.
4. The LCD will read “CC Set Up Mode”.
5. Place the appropriately sized GBC 4:1 plastic coil onto the Coil Driver so that the top loop is in contact with the
Black Rollers.