
User Manual


If your projector model has only three holes for mounting, then remove the
fourth arm with the hex key (I).
Warning! Do not use the projector mount with only two arms.
3. Slide the arms around the projector
mount and along the arm’s shaft to
position them over your projector’s
mounting holes. Make sure the notch
on the mount is as close to the
center of gravity for your projector
as possible.
4. Use the hex key (I) and the screws
from step 1 to secure the mount to
the projector, and tighten the arms
until secure.
5. Once the projector mount is attached to your projector, adjust the feet of the
arms vertically to level the mount.
Wood Studs
Wood studs run vertically inside the wall or across the ceiling, behind the drywall
or plaster. The plate must be mounted to a wood stud, or the plate could fall out
and damage the projector or cause personal harm.
Make sure the studs are at least 1.5 inches (38 mm) wide.
1. Use a stud finder to locate the edges of the wooden
stud.
2. Mark the centerline of the stud.
3. Place the mounting plate at the location marked for
your projector, and mark the spot of the two
mounting plate holes for drilling. Make sure this is
on the center line of the stud.
4. Use a 5/32-inch (4 mm) wood drill bit to predrill the
two marked spots for support holes 2.5 inches (64
mm) deep, and then clean out the debris.
5. Attach the plate by inserting the anchor screws
through the washers and mounting plate holes and
screwing them into the predrilled support holes
until secure.
6. Use a 3/8 inch (10 mm)
crescent wrench
to tighten the
anchor screws
through the
plate’s access
slots.
Concrete
Warning! Make sure the concrete anchors are installed into solid concrete that is
at least 8 inches (20 cm) thick. If concrete exhibits cracks or other defects, this
may result in failure of the concrete anchors and cause serious personal injury or
equipment damage.
1. Place the mounting plate at the location marked for your projector, and mark
the spot of the two mounting plate holes for drilling.
2. Use a 5/16-inch (8 mm) concrete drill bit to make
holes 2.5-inches (64 mm) deep on the marked
spots, and then clean out debris.
3. Insert the concrete anchors flush to the concrete, and use a mallet to
hammer the anchors into the drilled holes.
4. Attach the plate by inserting the anchor screws through the washers and
mounting plate holes, and screwing them into the concrete anchors until
secure.
5. Use a 3/8 inch (10 mm) crescent wrench
to tighten the anchor screws through
the plate’s access slots.
Attaching the Projector
1. Determine which screws
(J, K, L, M, or N) to use with
your projector.
2. Loosen the projector mount’s arms with the hex key (I).
6. Slide the projector mount into the mounting plate’s flange, and secure it with
the spring screw. Push the screw in, and rotate until secure.
Secure the
projector in the
mounting plate
with the included
security screw
(E).
Note: If you have a high ceiling, use a compatible 1.5 NPT extension column
(not included).
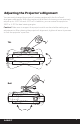
Refer to the instructions listed in
Adjusting the Projector’s Alignment
You can easily change the projector’s viewing angles with the AccuGear’s
dual-gear mechanism. With the simple pull and twist of a lever you can precisely
adjust up to ±20° tilt and ±10° roll. In addition, you can swivel the projector
360° or ±15° for ideal viewing angles.
Caution! Make sure to support the projector with one hand while making any
adjustments. After altering the projector’s alignment, tighten all security screws
to lock the projector’s position.
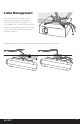
Cable Management
For a clean look, you can run A/V
and low-voltage power cables
through the mounting plate. You
may need to drill an extra hole in the
wood or concrete support structure
to fit the cables and connect them
to the projector.
Adjust the pitch, and run the cables through the mount as shown.
Using the AccuGear with 1.5 NPT-Compatible
Mounting Plates and Extension Columns
Use the AccuGear with other 1.5 NPT-compatible structural mounts or mounting
plates as well as extension columns.
Extend or suspend your
projector from high ceilings
with hardware such as the
Gabor SCP-770 Suspended
Ceiling Mounting Plate (sold
separately), which includes
a 1.5 NPT extension column
needed for attachment.
1. Attach a 1.5 NPT
extension column to
your compatible mount.
3. Remove your projector
from the mounting
plate if attached.
3. Loosen the extension
column security screw
on the AccuGear’s
mounting plate, and
screw the mounting
plate onto the end of
the extension column.
4. Tighten the security
screw.
Product Specifications
Maximum load capacity
50 lb. (22.7 kg)
Color
Black
Tilt
±20°
Roll
±10°
Rotation
360° / ±15°
Dimensions (H × W × D)
4.5 × 18 × 18 in. (11.4 × 45.7 × 45.7 cm)
Weight
3.1 lb. (1.4 kg)
13