===== 2 ==== ................ 3 4-5 Control 5 Features.................. 5 EnergySavinq Tips............... 7 PowerFailure!FreezerFailure.. 7 ice Service......................... 8 Care & Cleaninq .................. 9 Warrantyinformation............ 10 BeforeYouCall ................
Congratulations on your purchase of a new freezer! We are very proud of our product and we are completely committed to providing you with the best service possible. Your satisfaction is our #1 priority. We know you'll enjoy your new freezer and ThankYou for choosing our product. We hope you consider us for future purchases. PLEASE READ AND SAVE THESE iNSTRUCTiONS This Owner's Guide provides specific operating instructions for your model. Use your freezer only as instructed in this manual.
ELECTRICAL FOR YOUR SAFETY * Do not store or use gasoline, or other flammable liquids in the vicinity of this or any other appliance. Read product labels for warnings regarding flammability and other hazards. * Do not operate the freezer in the presence of explosive fumes. * Avoid contact with any moving parts of automatic ice maker. * Remove all staples from the carton. Staples can cause severe cuts, and also destroy finishes if they come in contact with other appliances or furniture.
ThisOwner'sGuideprovidesspecificoperating instructions foryourmodel.Usethefreezeronlyas instructed inthis Use&CareManual.Beforestarting thefreezer,followtheseimportantfirst steps. LOCATION • Choose a place that is near a grounded electrical outlet. Do Not use an extension cord or an adapter plug. • For the most efficient operation, the freezer should be located where surrounding temperatures will not drop below 40°F (5°C) or exceed 110°F (43°C).
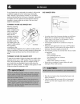
ICE MAKER INSTALLATION If your Freezer has an automatic ice maker, please refer to the two inserts in the bond pack that came with your Freezer to correctly hook-up your ice maker: 1 installation instructions 2 installation - Connecting ice Maker to Water Supply Shelf Front DOOR REMOVAL If door must be removed: 1 2 3 4 5 6 7 8 Gently lay freezer on its back, on a rug or blanket. Remove two base screws and base panel. Remove bottom hinge screws. Remove plastic top hinge cover.
INTERIOR LIGHT TO ADJUST CANTILEVER SHELVES The light comes on automatically when the door is opened. To replace the light bulb, turn the temperature control to OFF and unplug the electrical cord. Replace the old bulb with a bulb of the same wattage. DRAWER WITH ADJUSTABLE DIVIDERS Lift front edge up. Pull shelf out. The drawer, located at the bottom of the freezer, provides separate storage space for items that are difficult to store on freezer shelves.
• The freezer should be located VACATION in the coolest area of the room, away from heat producing appliances or heating ducts, and out of direct sunlight. • Let hot foods cool to room Short Vacations: temperature before placing in the freezer. Overloading the freezer forces the compressor to run longer. Foods that freeze too slowly may spoil or lose quality. Be sure to wrap foods properly, and wipe containers dry before placing them in the freezer. This cuts down on frost build-up inside the freezer.
Ifyourfreezerhasanautomatic icemaker,it willprovide iCE MAKER TiPS a sufficientsupplyof icefornormaluse.Duringthe initialstartupofyourfreezer,however, noicewillbe evelJng produced duringthefirst24hoursofoperation. Automatic icemakersarealsooptionalaccessories thatmaybe installedinsomemodelsatanytime.Callyourlocal [_ dealerforinformation. Bracket h_"-'lce Container TURNING YOUR iCE MAKER After the plumbing connections have ON ..... \ " " or less been completed, the ON water supply valve must be open
Keepyourfreezercleantopreventodorbuild-up. Wipe upanyspillsimmediately andcleanatleasttwicea year. Neverusemetallicscouringpads,brushes,abrasive cleanersor strongalkalinesolutionsonanysurface.Do not washanyremovable partsin a dishwasher. Always unplug the electrical before cleaning. power cord from the wall outlet Care & Cleaning Part What To Use Interior/Door Liner Chart Tips and Precautions Soap and water Baking soda and water Use 2 tablespoons of baking soda in 1 quart of warm water.
Major Appliance Warranty Information Your appliance is covered by a one year limited warranty. For one year from your original replace any parts of this appliance that prove to be defective in materials or workmanship maintained condenser, through 5th refrigeration maintained date of purchase, Electrolux will repair or when such appliance is installed, used, and in accordance with the provided instructions.
TROUBLESHOOTING GUIDE Before calling for service, review this list. It may save you time and expense. This list includes common occurrences that are not the result of defective workmanship or materials in this appliance. Freezer Does Not Run Freezer does not run. • Freezer is plugged into a circuit that has a ground fault interrupt. Use another circuit. If you are unsure about the outlet, have it checked by a certified technician. • Temperature control is in the OFF position.
Sound and Noise Louder sound levels whenever freezer is on. • Longer sound levels when compressor comes on. • Popping or cracking sound when compressor comes on. Modern freezers have increased • This is normal. When the surrounding noise level is low, you might hear the compressor running while it cools the interior. Freezer operates at higher pressures during the start of the ON cycle. • This is normal. Sound will level off or disappear as freezer continues to run.
Door Problems Door will not close. Freezer is not level, it rocks on the floor when it is moved This condition can force the cabinet out of square and mJsalJgn the door. Refer to "Leveling" in the "Installation" Section. Level the floor by using wood or metal shims under the freezer or brace floor supporting the freezer. slightly. Floor is uneven or weak. Freezer rocks on floor when it is moved slightly. Light Bulb Is Not On Light bulb is not on. Light bulb is burned out.