
Installation guide


4.Adjustthe "low" settingfor regularsurface
burnervalves(Figure10)
a. Pushinandturncontrolto LITEuntilburnerignites.
b. Quicklyturnknobto LOWESTPOSITION.
c. If burnergoesout,resetcontroltoOFF.
d. Removethesurfaceburnercontrolknob.
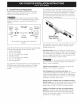
e. Insertathin-bladedscrewdriverintothehollowvalve
stemandengagetheslottedscrewinside.Flamesize
canbeincreasedordecreasedwiththeturnofthe
screw.Turncounterclockwiseto increaseflamesize.
Turnclockwiseto decreaseflamesize.Adjustflame
untilyoucanquicklyturnknobfromLITEto LOWEST
POSITIONwithoutextinguishingtheflame.Flame
shouldbeassmallaspossiblewithoutgoingout.
Counterdo_
Clockwise
5.Adjustthe "LOW"Settingof the DualBurner
SurfaceValve(Figure10)(somemodels):
Note:Onthedualvalvethelowsettingof eachportion
shouldbeadjustedindividually.
a. Pushinandturnknobto LITEthencontinueto turn
untilonlytheinnerportionof thedualburnerstays
on.
b. Quickly turn knob to LOWEST POSITION.
c. If burner goes out, reset control to OFF.
d. Remove the surface burner control knob.
e. The inner portion of the dual burner flame size can
be increased or decreased with the turn of the screw
B. Use screw A to adjust the low flame size of the
outer portion of the dual burner. Turn the screw
counterclockwise to increase flame size. Turn the
screw clockwise to decrease flame size. Adjust flame
until you can quickly turn knob from HIGH to LOWEST
POSITIONwithout extinguishing the flame. Flame
should be as small as possible without going out.
Note: Air mixture adjustment is not required on surface
burners.
When All Hookups are Complete
Make sure all controls are left in the OFFposition.
Make sure the flow of combustion and ventilation air to
the cooktop is unobstructed.
Hollow
Valve
Stem
Regular
Burner
Valve
Figure 10
Note: Air mixture adjustment is not required on surface
burners.
Model and Serial Number Location
The serial plate is located on the underside of the
cooktop.
When ordering parts for or making inquires about your
range, always be sure to include the model and serial
numbers and a lot number or letter from the serial plate
of your cooktop.
Your serial plate also tells you the rating of the burners,
the type of fuel and the pressure the cooktop was
adjusted for when it left the factory.
Before You Call for Service
Read the Before You Call for Service Checklist and
operating instructions in your Use and Care Guide.
It may save you time and expense. The list includes
common occurrences that are not the result of defective
workmanship or materials in this appliance.
Refer to the warranty in your Use and Care Guide for
our service phone number and address. Pleasecall or
write if you have inquiries about your product and/or
need to order parts.
9