
Installation guide


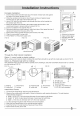


FIG.3A FIG.4 FIG.5
electronics plug
FIG.3B
B_
B. front panel screw
A. shipping screw C. handle
• Handle the air conditioner gently.
t Be sure your air conditioner cabinet does not fall out of the opening during installation or removal.
• The place where the power cord exits the air conditoner should be no more than 4 ft (122 cm) from a grounded
3 prong outlet.
® Do not block the louvers on the front panel.
• Do not block the louvers on the outside of air conditioner.
® Do not lift, pull or remove any expanded polystyrene (foam) from inside of the air conditioner. It is not packing
material
Attach Top Channel (FIG.6): .....A B FIG.6
.... 1, f'
• Attach the top channel and side curtains to the air conditioner cabinet before
placing the cabinet in the window.
1. Locate provided bag of screws.
2. Place the top channel on top of the air conditioner cabinet, lining up the three
holes in the top channel with the three holes on top of the air conditioner cabinet.
3. Using three #10 X 1/4" pan-head Phillips thread cutting screws, attach the top A. #10 X 1/4" pan-head Phillips
channel to the air conditioner cabinet, thread cutting screws
B. Top channel
Attach Side Curtains :
1. Locate provided bag of screws.
2. Insert the right-hand curtain connector tab into the curtain housing channels on the air conditioner (FIG.7A).
3. Insert the top and then the bottom of the right-hand curtain housing in the top and bottom curtain channels on the
air conditioner (FIG.7B, FIG.7C).
4. Slide the curtain housing into the curtain guides as far as it could go.
5. Repeat the above steps for the left-hand curtain.
FIG.7A A FIG.7B Top view
@ A B
FIG.7C Bottom view
B
A. Side Curtain
A. Curtain housing
B. Curtain top channel
on air conditioner
A. Curtain housing
B. Curtain bottom channel
on air conditioner