
Installation guide


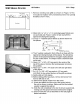


Wall Sleeve Brands: #2 F_s 19_,
i, Remove existing rear gr;ile ,as shown on P_g_ 2 of _his
ma_U_ and roplace p[ovided b teat panel,
Install as show_! here.
2. A_ach (2) 4 Vz"x 3 _4_÷× i W' conscript's blocks one
on each side wall. Pla_ i# center d s_e wall w_h _e
red: end facing the op#ing,
3, Cut (2) !7" Tapered Spa_ BI as _low i_
tT',
4. The 4° section _splaced i_ fro_ of 1he rib on with #}e
_ed e_o facing the ba_ of _e sl , The femai_hhg
peAion will be placed _#_nd _e _b agai_ sloping t rdi
#'_erear o_ the sl . _is helps i_duce a rd slo_
the uR[t,
5, A_ch ,fl_ 1 × 3/8 × 25, long _al i_ the _n_er at the
lop of the sleeve, Re_ve the b ng p a_d press
i;nto position,
6, {2) 1" x 3/8" × 14" _als !o _e leftand right si_s
of the sl ,
7, Cut (r2) ! _ X X 25 _'long IStO !4' long h
and a to _he s o! the g_ille as shown.
8, Gently sli_ ur_i_,into sleeve,
9, re sliding all-_e_ay back, remove 2nd _few
on le_ of u_it.
! 0. R the plastic washe_ _he scr_,
11, Screw and the o&er e_'_do_ the g_eu_d to
the unff as shown in re, Make sure that the t_thed
washe_ is against the cabinet,
!2. SI_{_ the unit letely to _e to e_s_;re a go_ _al,
m_k_ng sure _e nd w_re _es not me tangled.
! 3. Seal & _he uait as described oe the last page ef
these instructions.