
Installation Guide


28
INSTALACIÓN DE CABLE VERTICAL AL
13
HOME TRADITIONAL
Fig. 1
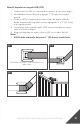
Paso 3: Aplicar tornillos
1� Fije el panel a cada uno de los 4 soportes utilizando el tornillo
autorroscante que se suministra con una punta T-25�
Consejo: Taladrar previamente con una broca de 3/16”
[4.5mm].
Nota:
• Se recomienda que todos los paneles se fijen con los tornillos
que se suministran del mismo lado del soporte al utilizar un
poste en línea. Como se muestra en la Fig.1
• Sólo se necesita un tornillo para asegurar el soporte al
panel.
Fig. 1
OTP and Proud Post: Max Post Spacing
• 8’ panel maximum post spacing is 93-7/8”.
• 6’ panel maximum post spacing is 69-7/8”.
Note: Do not exceed the maximum post spacing.
8’ Panel max post spacing 93-7/8”
6’ Panel max post spacing 69-7/8”
OTP and Proud Post: Measuring The Panel Opening Length
• Measure the distance of the panel opening.
• Measure from the back wall of the bracket to the back wall of the bracket on other post.
• Confirm that the measurements for the top brackets are the same as the bottom brackets.
Measure the panel opening
Not here
Measure from
back of bracket
Check measurement with top
3/12
Paso 4: Sujetar el soporte en I a la plataforma
1� Sujete el soporte en I a la superficie de la plataforma con el tornillo para
madera de cabeza Phillips suministrado�
Consejo: Taladrar previamente con una broca de 1/16” [1.5mm].