
Installation Guide


16
Fire Magic units are equipped with orifi ces for natural gas,
unless otherwise indicated. For use with propane gas, smaller
orifi ces must be installed to avoid hazardous overheating.
Please refer to Table 1 for the correct orifi ce size. Check
the orifi ce size by following the instructions below. The drill
size is stamped on the orifi ce. If the number is not visible
you may have to remove the orifi ce (as detailed below) to
read the number stamped on the side of the orifi ce.
If you are not sure you have the correct sideburner
orifi ce size (or wish to change the orifi ce), follow the
steps below.
CAUTION: If the burner has been in use, wait until
the burner and its components are cool
to the touch.
IMPORTANT: When converting orifi ces for different gas
type, the regulator must also be converted
for the new gas type. Reference the
CHECKING AND CONVERTING THE
REGULATOR section.
1. Turn off the gas shutoff valve. Remove sideburner
cover and lift off cooking grid.
2. Remove the control panel. See the CONTROL PANEL
REMO
VAL section for details.
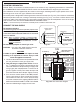
3. Reach up under the b
urner support and remove the
burner retaining clip (see Fig. 16-1), located at the
rear of the burner pipe.
4. Remove the burner cap and carefully lift the burner
up and out, clearing the ceramic electrode (see Fig.
16-2), and pulling the burner tube away from the
orifi ce, located on the end of the orifi ce holder on
the left side of the unit (see Fig. 16-3).
Note: You do not have to lift the burner completely out
of the unit to access the orifi ce.
5. Using a
3
/
8
" socket, remove orifi ce from the orifi ce
holder (see Fig. 16-3) and check the number
stamped on the orifi ce face.
6. If an orifi ce change is necessary, replace the orifi ce
with the correct size.
7. Replace the sideburner tube over the orifice,
aligning the burner over the electrode, taking care
not to detach it from the wire.
8. Replace the burner retaining clip (underneath
burner), and burner cap.
9. Repeat steps 3. through 8. for the second burner.
10. Replace the control panel, bezels, and control
knobs.
11. Replace the grid and cover.
Fig. 16-1 Remove burner clip
Fig. 16-2 Remove burner
CONVERTING THE GAS TYPE
REV 4 - 1502100845
L-C2-334
Fig. 16-3 Orifi ce location
Orifi ce
holder
Orifi ce
located at
end of orifi ce
holder