
User's Manual


Extron • VTG 150 & VTG 200 • User’s ManualExtron • VTG 150 & VTG 200 • User’s Manual
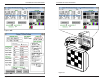
VTG 200 RS-232 Control and Software
Page 5-6
Figure 5-6A
↑↑
↑↑
↑
Figure 5-6C
↑↑
↑↑
↑
Figure 5-6B
↑↑
↑↑
↑
VTG 200 RS-232 Control and Software
Page 5-5
VTG 200 Control Program
The
VTG 200 Control Program
is a Windows-compatible
program (requiring Windows 3.1 or later) that provides four
basic functions:
• Remote control of the VTG 200 scan rate and test pattern
• Listing VTG 200 scan rates and details of those rates
• Adding new rates into the VTG 200 (one at a time)
• Restoring, updating, or saving all scan rates for the VTG 200
Installing the Software
The program is contained on a single 3.5” diskette and will
run from the floppy drive. However, it is more convenient to
load and run it from the hard drive. It can be installed on the
user’s hard-drive as follows:
1. Insert the Extron software diskette into the floppy drive.
2. From the Windows File menu, click on Run.
3. Specify the disk drive and type “setup”. For example, type
A:SETUP
if the diskette is in drive A.
The program will occupy approximately 1 MB of hard drive
space.
The Windows installation will create (by default) a C:\VTG200
directory and will place 2 icons (
VTG 200 Control Program
and
VTG 200 Help
) into a group titled “Extron Electronics”.
See figure 5-6A.
Using the Software
1. For information about program features, double click on the
VTG 200 Help
icon in the Extron Electronics group. Help
can be accessed from its icon (stand-alone) or from within
the program by the menu on the main screen or by pressing
F1 from within the control program. See figure 5-6B.
2. To run the software, double click on the VTG 200 Control
Program icon in the Extron Electronics group.
3. A Comm menu will be displayed on the screen. (See
Figure 5-6C.) Click on the Comm port that is connected to
the VTG 200 RS-232 connector.
4. The Extron VTG 200 Control Program window displays
available scan rates and test patterns, and the program
awaits user action (see figure 5-7A).
Clicking the “Rate VIEW” option with rate #61 selected as
shown will produce the screen shown in figure 5-7B. Use the
program help options to assist you in choosing other options.
Figure 5-8 illustrates using the control program to select a
scan rate and pattern, which is displayed on the monitor
being tested.