
Manual


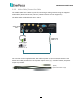
Table Of Contents
- Introduction
- Getting Started
- General Operation
- OSD Root Menu
- Search and Playback
- System
- Remote Access to the Mobile DVR
- Accessing the Mobile DVR on the Network
- Remote Live View
- Menu Bar
- Express
- Camera
- Basic Setting
- Adjust Setting
- Record
- Event
- Alarm
- Video Loss
- Motion
- GPS Event
- G-Sensor Event
- Other
- Disk
- Disk
- SD Card
- Lock/Format
- Display Setting
- Monitor OSD
- M/T SEQ
- Network
- LAN
- Wireless
- Mobile
- DDNS
- FTP
- Alarm Server
- Remote/Mobile
- Xfleet
- Schedule
- Express Setup
- Holiday
- Schedule
- System Setting
- Date/Time
- Daylight Saving
- User Group
- User Management
- I/O Control
- EKB200 Setting
- Miscellaneous
- Information
- System
- Log
- Copy
- Search
- Time Search
- Event Search
- PTZ
- Specifications
- Troubleshooting
- Appendix A: Network Overview
- Appendix B: Linksys & D-Link Port Forwarding
- Appendix C: Timing of Alarm Modes
- Appendix D: Express Setup Recording Value Selection Rules
- Appendix E: IR Remote Control
- Appendix F: RTSP URL Syntax
- Appendix G: Tested Card Brands
- Appendix H: Recording Backup through EF-Reader
- Appendix I: Auto HDD Retry Mechanism

EMV400 FHD Mobile DVR
16
2.4 Vehicle Connection
The mobile DVR supports input power voltage between 9 VDC ~ 36 VDC. You can install the
mobile DVR in all kinds of vehicles support the above power voltage. The diagrams below are
examples to illustrate the connection inside car / truck with 12 VDC / 24 VDC.
2.4.1 Connecting to a Truck with 24 VDC
Glove box (inside or underneath)
Driver’s seat (between the seat and the back panel) or underneath the Passenger seat
24V+ (Red)
IGN (
Yellow)
Relay (24V)
GND (
Black)
Vehicle Battery
+
-
24V
Power Harness Cable
Fuse (15A)
Lock
ACC
On
Power
ACC
Note:
1. If the car is without an ignition key, please connect the IGN (yellow) wire directly or
via a switch to the vehicle battery.
2. It is suggested to use a relay in the installation. Otherwise, the mobile DVR will always
draw the power from the vehicle battery.