
Manual


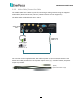
Table Of Contents
- Introduction
- Getting Started
- General Operation
- OSD Root Menu
- Search and Playback
- System
- Remote Access to the Mobile DVR
- Accessing the Mobile DVR on the Network
- Remote Live View
- Menu Bar
- Express
- Camera
- Basic Setting
- Adjust Setting
- Record
- Event
- Alarm
- Video Loss
- Motion
- GPS Event
- G-Sensor Event
- Other
- Disk
- Disk
- SD Card
- Lock/Format
- Display Setting
- Monitor OSD
- M/T SEQ
- Network
- LAN
- Wireless
- Mobile
- DDNS
- FTP
- Alarm Server
- Remote/Mobile
- Xfleet
- Schedule
- Express Setup
- Holiday
- Schedule
- System Setting
- Date/Time
- Daylight Saving
- User Group
- User Management
- I/O Control
- EKB200 Setting
- Miscellaneous
- Information
- System
- Log
- Copy
- Search
- Time Search
- Event Search
- PTZ
- Specifications
- Troubleshooting
- Appendix A: Network Overview
- Appendix B: Linksys & D-Link Port Forwarding
- Appendix C: Timing of Alarm Modes
- Appendix D: Express Setup Recording Value Selection Rules
- Appendix E: IR Remote Control
- Appendix F: RTSP URL Syntax
- Appendix G: Tested Card Brands
- Appendix H: Recording Backup through EF-Reader
- Appendix I: Auto HDD Retry Mechanism

EMV400 FHD Mobile DVR
14
2.3 SD Card Installation
The mobile DVRs provide SD card function for Alarm event backup recording. Please follow the
steps below to install the SD Card. Up to 32 GB SD / SDHC cards are supported (see Appendix G
Tested Card Brands).
1. On the front panel of the mobile DVR, unscrew the SD card protection plate.
2. Lift up the SD card protection plate and then insert a SD card.
3. Screw back the SD card protection plate. The SD card installation is now complete.
The Mobile DVR will automatically detect when a new SD card has been inserted and the below
SD card format message will pop-up. Click Yes to format the SD card. The formatting process will
take about 30 ~ 60 seconds. Note that only the formatted SD card can be used for alarm event
backup recording function.