
Manual


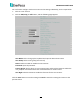
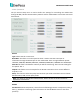


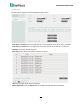
Table Of Contents
- Introduction
- Getting Started
- General Operation
- OSD Root Menu
- Search and Playback
- System
- Remote Access to the Mobile DVR
- Accessing the Mobile DVR on the Network
- Remote Live View
- Menu Bar
- Express
- Camera
- Basic Setting
- Adjust Setting
- Record
- Event
- Alarm
- Video Loss
- Motion
- GPS Event
- G-Sensor Event
- Other
- Disk
- Disk
- SD Card
- Lock/Format
- Display Setting
- Monitor OSD
- M/T SEQ
- Network
- LAN
- Wireless
- Mobile
- DDNS
- FTP
- Alarm Server
- Remote/Mobile
- Xfleet
- Schedule
- Express Setup
- Holiday
- Schedule
- System Setting
- Date/Time
- Daylight Saving
- User Group
- User Management
- I/O Control
- EKB200 Setting
- Miscellaneous
- Information
- System
- Log
- Copy
- Search
- Time Search
- Event Search
- PTZ
- Specifications
- Troubleshooting
- Appendix A: Network Overview
- Appendix B: Linksys & D-Link Port Forwarding
- Appendix C: Timing of Alarm Modes
- Appendix D: Express Setup Recording Value Selection Rules
- Appendix E: IR Remote Control
- Appendix F: RTSP URL Syntax
- Appendix G: Tested Card Brands
- Appendix H: Recording Backup through EF-Reader
- Appendix I: Auto HDD Retry Mechanism

EMV400 FHD Mobile DVR
203
You can further configure each user account and its settings individually, see the steps below:
1. Click on a user account.
2. Click the Add, Copy or Edit button, and the following page appears.
User Name: Click to bring up the keyboard and input the desired user name.
User Group: Select a user group (access level).
Status: Select to enable or disable the user account.
Password: Input the password.
Camera Access: Click to bring up a new setting page, and check the boxes to enable the
live, playback or PTZ functions of the cameras for local or remote access.
User Right: Check the boxes to enable the functions for the user account.
Click the Save button to save the settings or Cancel to cancel the settings and return to the
previous menu.